Hey there, fellow PicLumen enthusiast! We are highly excited to announce the release of a new feature in PicLumen – AI Replace!
Have you ever wanted to change something in the existing AI-generated image, like swapping out a boring background or replacing an object with something way more extraordinary?
Well, guess what? PicLumen just made that super easy with our brand-new feature, AI Replace. This fancy tool does all the hard work for you, making your images look like the visuals were totally different—even if you’re just getting started!
In this tutorial, I’ll walk you through everything you need to know about our AI Replace. Whether you’re familiar with AI image generators or not, you’ll find this guide super helpful. Ready? Let’s go!
What is PicLumen’s AI Replace?
If you’ve ever wanted to tweak or transform your AI-generated images, this tool is exactly what you need. Whether you’re looking to swap out an element, add something new, or even play around with colors, AI Replace makes it easy to enhance your creations with just a few clicks.
PicLumen’s AI Replace works exclusively with images created by its AI image models. This means that directly uploaded photos/images or generated by Flux model aren’t compatible with these advanced editing features.
An important note:
How Does PicLumen AI Replacer Work?
AI Replace is designed to work seamlessly with images created within PicLumen’s generative AI. Here’s how it enhances your creative process:
- Weave new wonders into your scene:
If your image needs an extra touch, the AI inpainting lets you seamlessly integrate new elements into the existing scene.
- Refine your images with AI Swap:
The generated images might sometimes have small imperfections or areas that don’t quite work. AI Swap allows you to correct these with precision, ensuring that every part of your creation is polished to perfection.
- Add playful twists:
Want to add something fun or unexpected to your image? With our AI replacement, you can easily modify specific areas to introduce new, creative details. This feature lets you transform ordinary elements into something extraordinary, giving your images a unique, playful character.
- Infuse scenes with color replacement:
With PicLumen’s AI image replacer, you can modify colors in specific areas using simple text prompts.
- Face swap fun:
It makes it easy to do AI face swapping for the generated images.
Step-by-Step Guide to Using PicLumen’s AI Replace:
Now that you know what PicLumen’s AI Replace can do, let’s explore a few specific scenarios in which this powerful tool can truly shine.
First thing first, I’ll tell you guys the regular steps for using our AI image replacer:
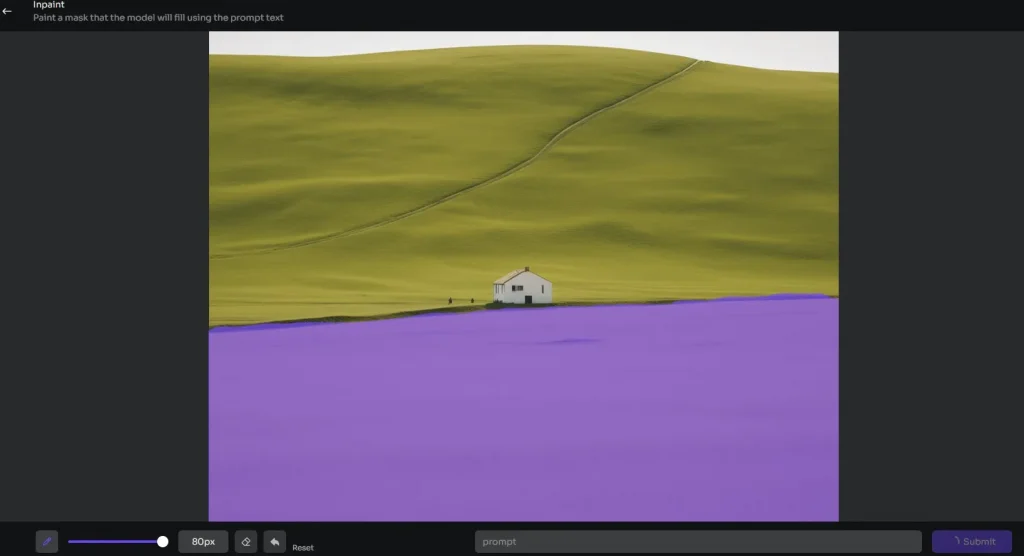
- Step 1: Brush Over the Area You Want to Change
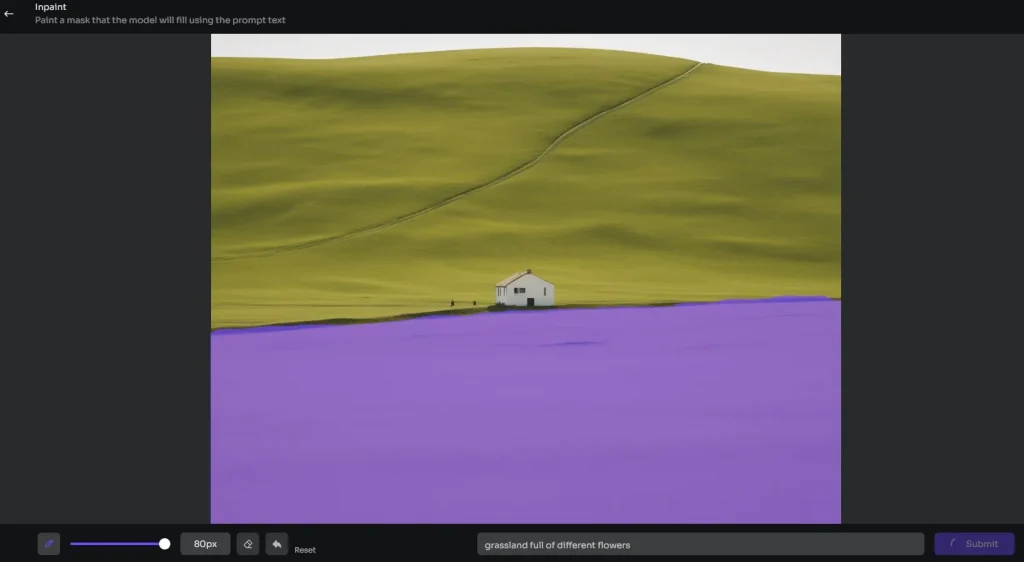
- Step 2: Enter Your Prompt
- Step 3: Generate Your New Image
Now let’s start the major part of the day, how you actually work with AI Replace.
Scenario 1: Transforming a Dull Sky into a Vibrant Sunset
Let’s say you’ve generated an image with a beautiful landscape, but the sky looks dull and overcast.It looks like this:
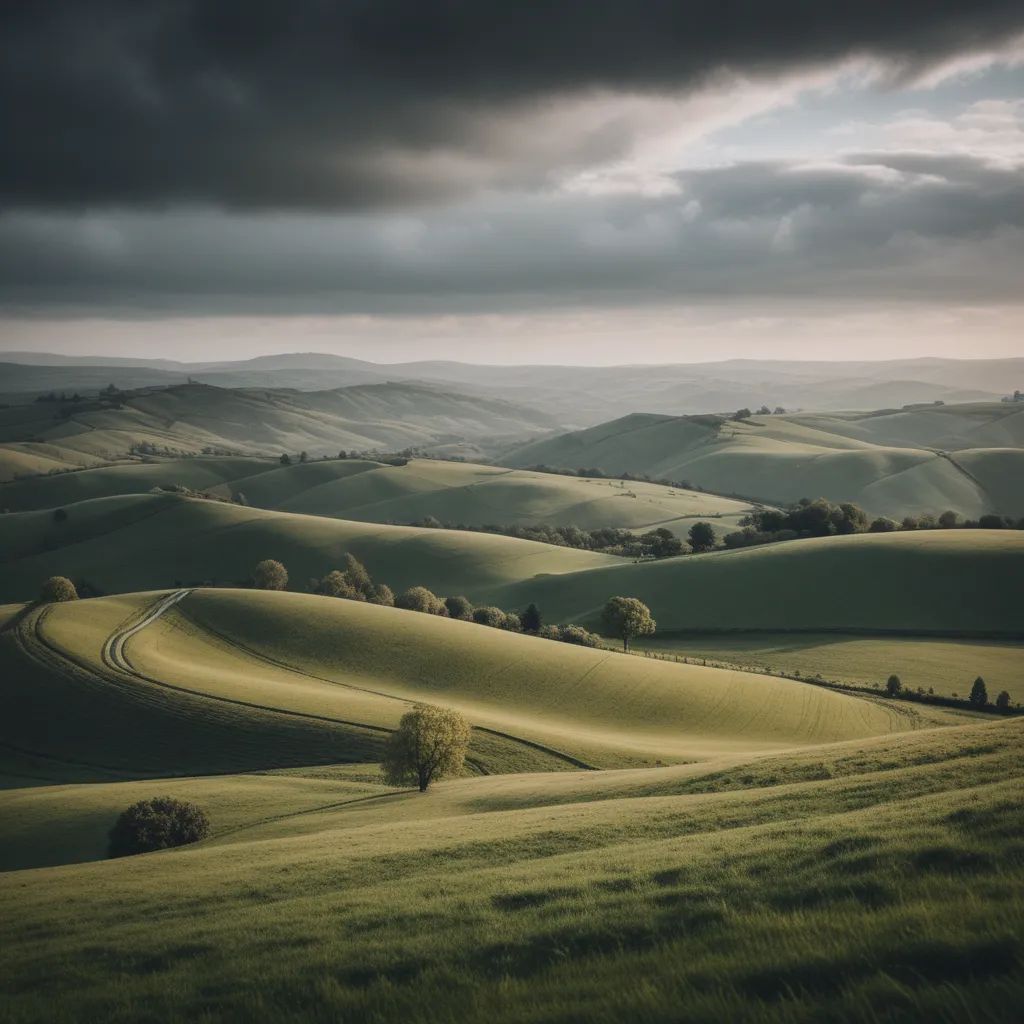
But you need a brighter image and want to change the sky. The AI replacement function allows you to perform a couple of actions.
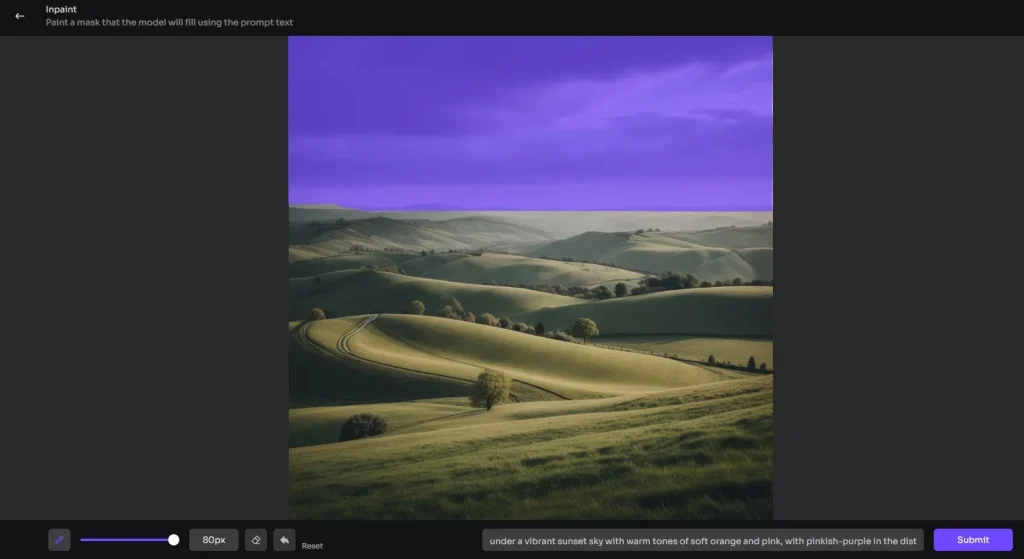
How to do:
1. Select the brush size and paint the area you want to replace.
2. Input your prompt to describe what sky you need.
3. Submit your request and wait for the new image.
Then you will get this result:
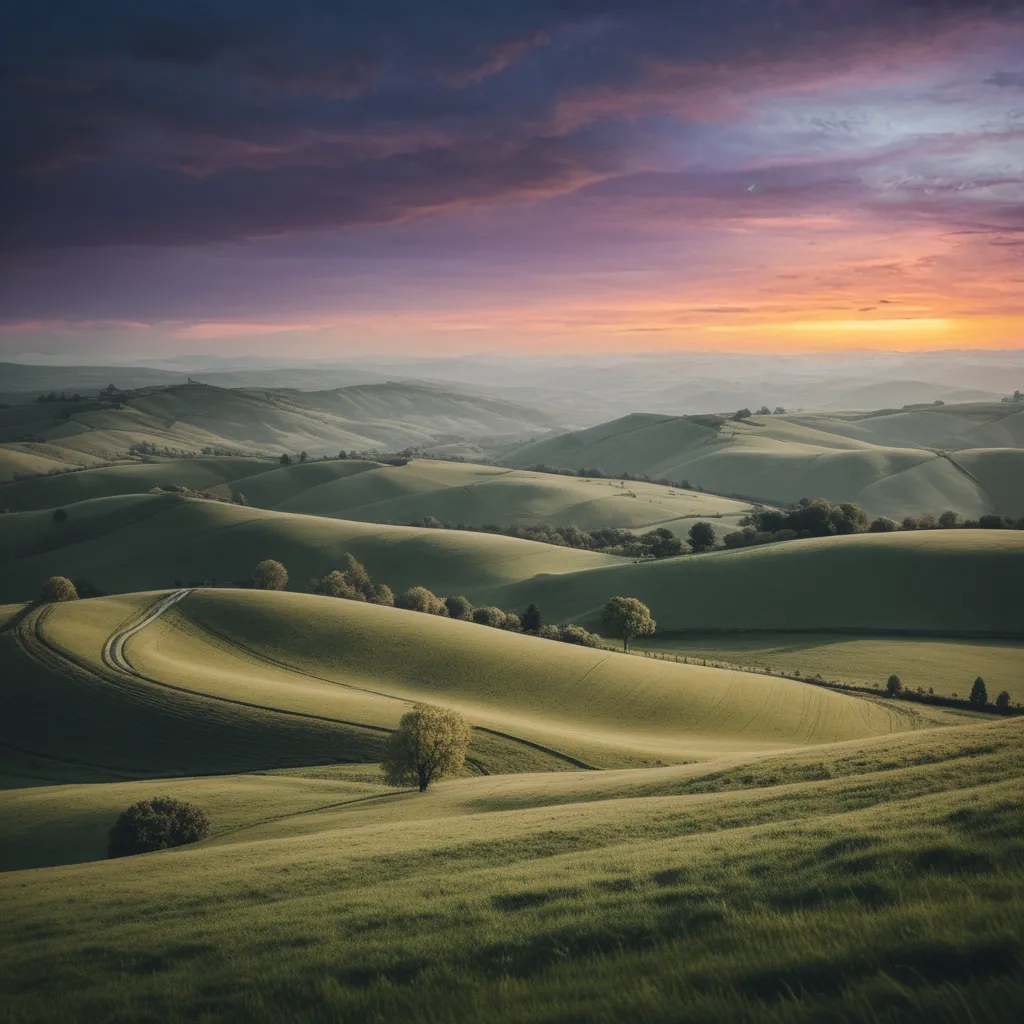
It looks okay, right? But don’t you think there’s still a disconnect between the sky and the ground? They are not harmonious. Don’t worry, I have a tip to improve it.
The key point is to paste your primary text prompts when you type replace prompt.
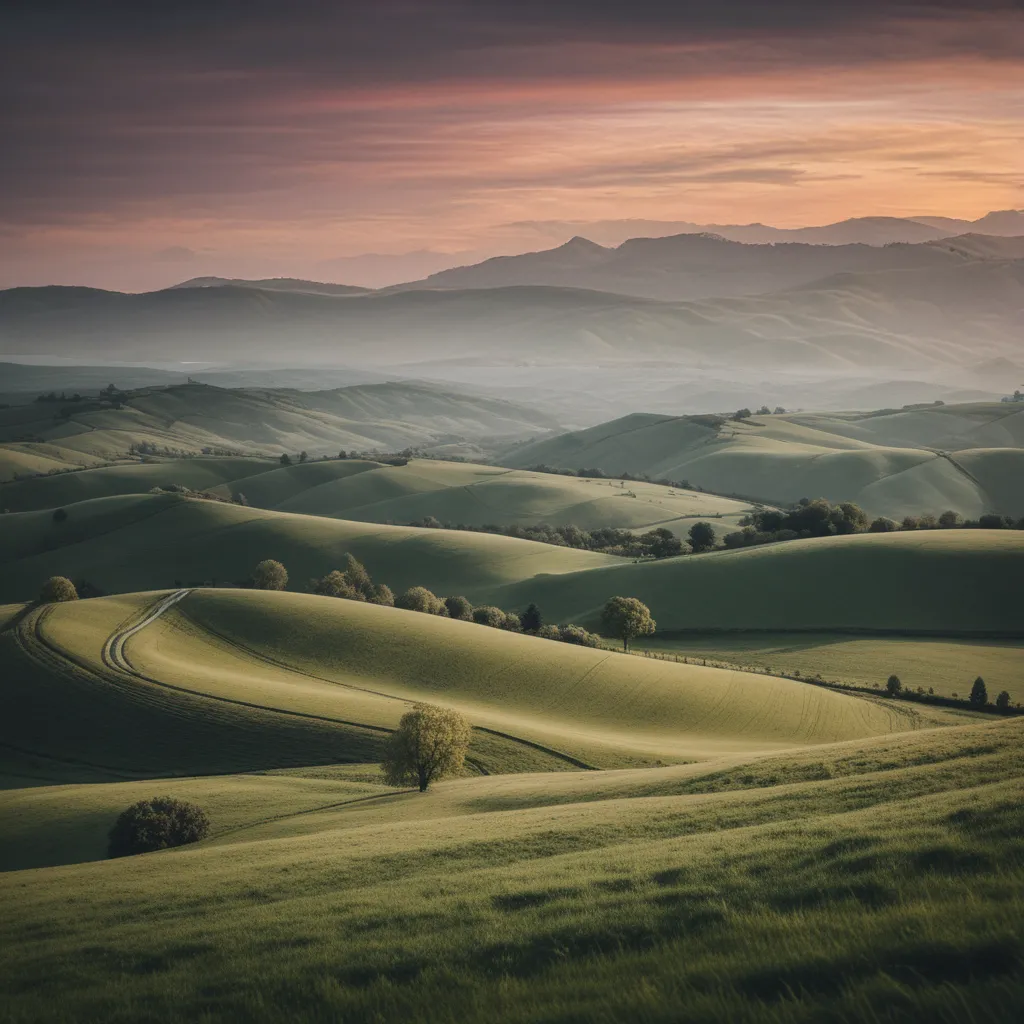
For the former image, I just entered the prompt to describe the sky I want—”under a vibrant sunset sky with warm tones of soft orange and pink, with pinkish-purple in the distance.”
To get a better result, I pasted the primary prompts. I incorporated the new sky description – “A wide-angle shot of a serene landscape with rolling hills, under a vibrant sunset sky with warm tones of soft orange and pink, with pinkish-purple in the distance, captured during the late afternoon with soft, diffused light, shot with a Sony A7R IV, 28mm lens, subtle cool tones”. Then I get this image:
Scenario 2: Adding a Playful Element to a Simple Scene
If you get an image that’s not too bad, but on closer inspection, it’s a bit boring. Then, it’s time for our Inpainting to step in; paint the parts that need more detail, then enter your description.
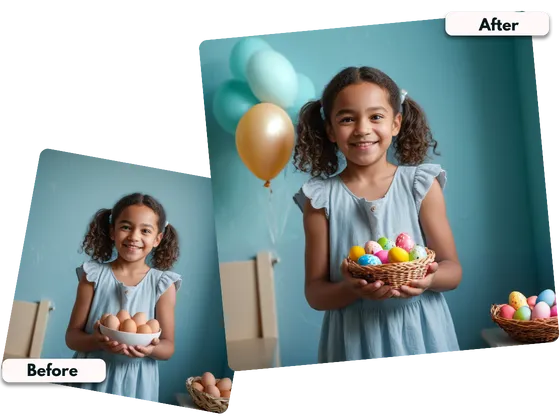
I also have tips for the replacement. As you can see, I added two details to the picture. Actually, I did two separate AI swaps. I know you guys want a one-time result, and I’ve tried that, too, but I didn’t get satisfactory results. Therefore, I generated them separately and then got a more ideal result.
For the first generation, I replaced the eggs with Easter Eggs. Then, I brushed the wall to add some decorations based on the first-time generated image.
Another tip is that when you swap little parts that don’t significantly influence the image, you could just type the necessary text prompts without pasting the primary prompt.
Scenario 3: A Red Umbrella in the Dim Rain
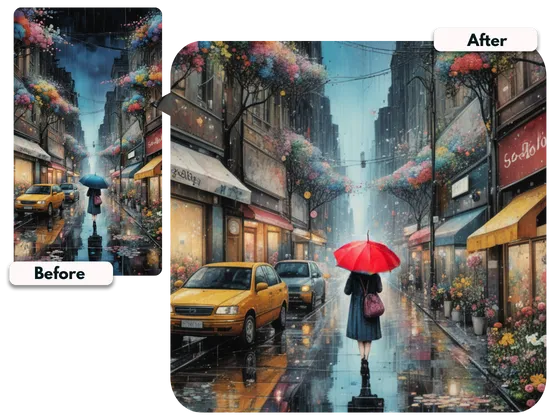
This usage is suitable for highlighting the focal point of your image or making the colours more harmonious. However, I would suggest changing the colors for specific items. If the overall colors of the image do not meet your expectations, modify your text prompts and add a description of the colors, then generate a new one.
Scenario 4: A Face Swap into a Bearded Male
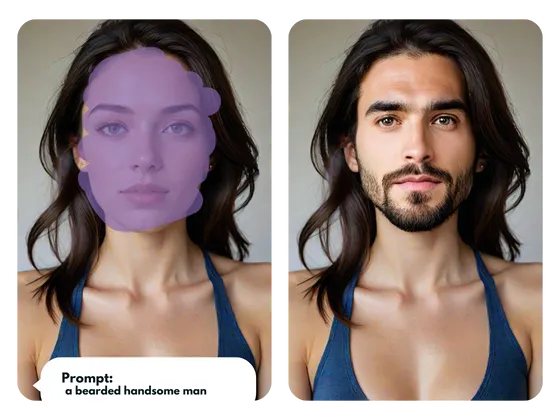
No bullshit, just look at my creation:
Advanced Tips for Optimizing AI Replace
Now that you’ve got the basics down, let’s kick things up a notch! PicLumen’s AI Replace isn’t just about quick fixes—it’s a powerful tool that can help you achieve some truly amazing results. These advanced tips will help you get the most out of AI Replace, whether aiming for photorealism, artistic effects, or something in between.
Refine your prompts for better result
The quality of your text prompts plays a huge role in the success of your AI Replace edits. Here’s how you can optimize your prompts:
- Be Specific: The more detailed your prompt, the better the AI can understand and execute your vision. Instead of saying “replace with a tree,” try “replace with an oak tree with dark green leaves and a thick trunk.”
- Use Descriptive Language: Include color, texture, lighting, and mood in your prompts. For instance, “replace the sky with a sunset with deep orange and purple hues, with the sun half-set and rays peeking through clouds.”
- Test Variations: Don’t hesitate to tweak and test different prompts if the first result isn’t exactly what you wanted. Sometimes, small changes in wording can lead to significantly different results.
Refining your prompts allows you to guide the AI more effectively, ensuring the replacements fit your creative vision.
Pay Attention to Lighting and Shadows
One of the keys to making AI Replace edits look natural is matching the lighting and shadows of the new element with the existing scene. Here’s how to optimize this:
- Observe the Light Source: Before making replacements, identify the light source in your image. Ensure the new element aligns with this source—shadows should fall in the same direction, and the lighting should be consistent.
- Adjust the Lighting Manually: If the AI-generated replacement doesn’t perfectly match the existing lighting, use PicLumen’s editing tools to tweak brightness, contrast, and shadow intensity. This helps ensure that everything looks cohesive.
Matching lighting and shadows is essential for creating believable, professional-quality images.
Wrapping Up: Key Takeaways and Next Steps
You’ve come a long way in mastering PicLumen’s AI Replace! From understanding the basics to diving into advanced techniques, you’re now equipped to transform your AI-generated images like a pro.
What’s Next?
- Experiment and Share: The more you play around with AI Replace, the more you’ll discover its potential. Don’t forget to share your creations on social media or with the PicLumen community—we’d love to see what you come up with!
- Explore Other PicLumen Features: There’s so much more to PicLumen than just AI Replace. Take some time to explore our other tools, like AI Outpainting, Image-to-Image, or the Upscaler. Each one can add a unique touch to your projects.
- Keeping Update: PicLumen is always evolving, with new features and updates coming regularly. Keep an eye on our blog to stay in the loop.
Your journey with PicLumen’s AI Image Generator doesn’t have to end here. In fact, it’s just beginning! We’re excited to see how you’ll use this tool to bring your creative visions to life.
