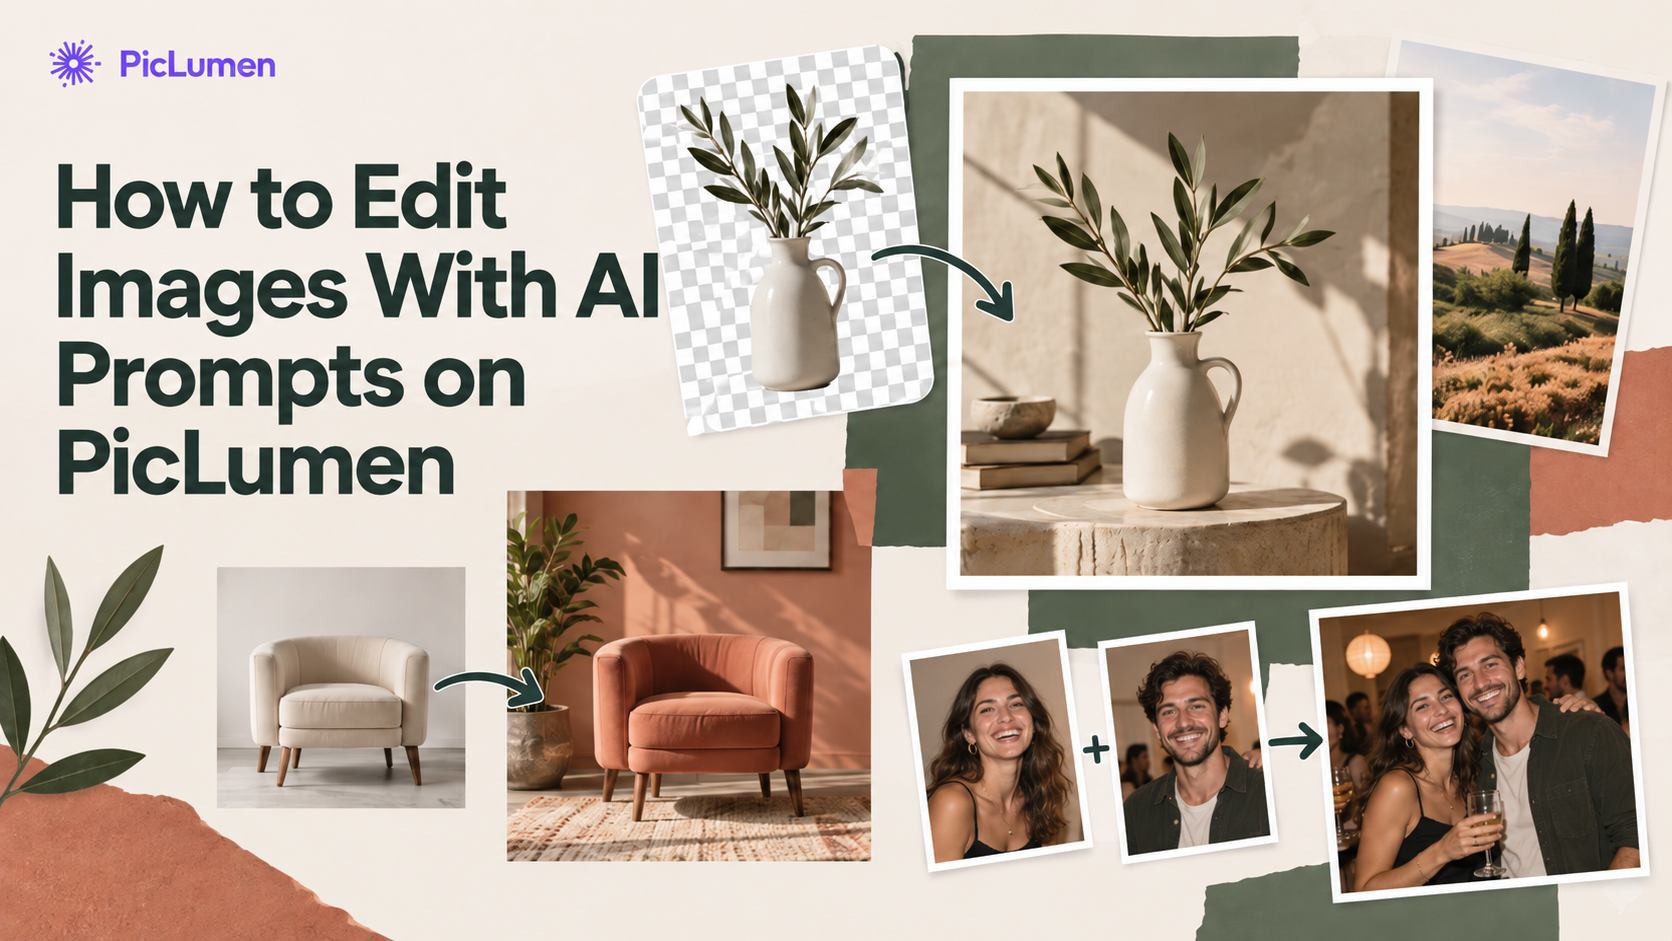
AI image editing lets you work from an existing image instead of starting from scratch. You can remove unwanted elements, replace products or objects, change a background, adjust clothing and colors, combine several references, or restyle an image while keeping the parts that already work.
On PicLumen, these edits can be completed with supported image models using source images, reference images, and natural-language prompts.
This tutorial covers the main AI image editing workflows and shows how to write prompts that keep each edit focused.
What Can You Edit With AI?
AI image editing can cover a wide range of common tasks, depending on the model you use. You can:
Remove unwanted people, objects, or background elements
Replace products, clothing, accessories, or other objects
Change the background or move a subject into a new scene
Adjust colors, materials, and small visual details
Add new objects to an existing image
Combine people, products, and environments from multiple references
Keep the same character while changing the setting
Restyle an image while preserving its main composition
Recompose the framing or expand the visible scene
Most of these edits follow the same basic workflow:
Source image + reference images + editing prompt → edited result
The main difference between tasks is how clearly you define what should change, what should stay unchanged, and which reference controls each part of the result.
How to Edit an Image With AI on PicLumen
Step 1: Upload the Image You Want to Edit
Start with the image that contains the subject, composition, or scene you want to keep.
If the edit depends on a specific product, person, object, or environment, add the relevant reference image as well.
For example:
Image 1: Original image
Image 2: Product reference
For a more complex edit:
Image 1: Character
Image 2: Product
Image 3: Environment
Use clear references when specific visual details need to stay consistent.
Step 2: Select an Image Model
Choose an image model that supports image editing, image-to-image generation, or reference-image input.
On PicLumen, you can try models such as GPT Image 2.0, Seedream 5.0 Pro, Nano Banana 2, or Qwen Image 3.0 for different editing tasks.
Model performance can vary depending on the image, prompt, and reference material. If one result changes too much of the original image, try another supported model before making the prompt unnecessarily long.
Step 3: Describe the Edit
A clear image editing prompt should define three things:
What should change
Which reference should be used
What should remain unchanged
For example:
Replace the white handbag with the handbag from Image 2. Keep the woman's facial features, hairstyle, clothing, pose, background, lighting, and camera angle unchanged.
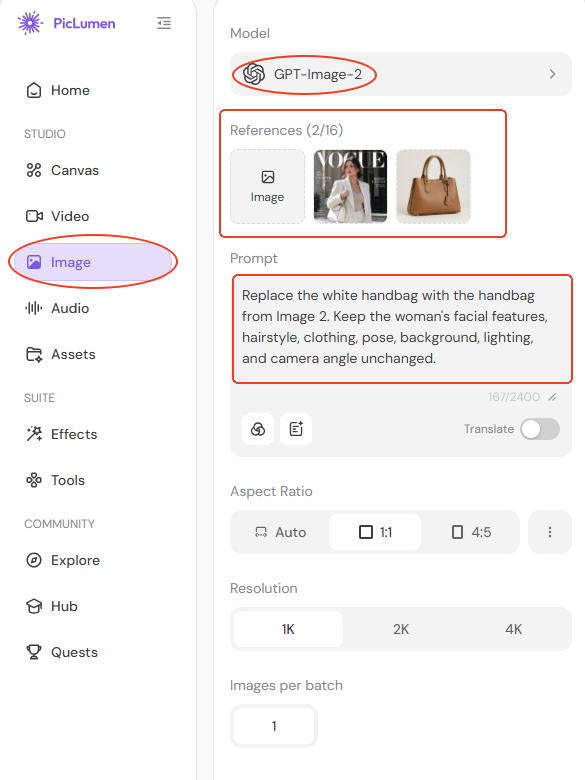
This gives the model a clear editing boundary.
Step 4: Generate and Review the Result
Generate the edited image and check the area affected by the change.
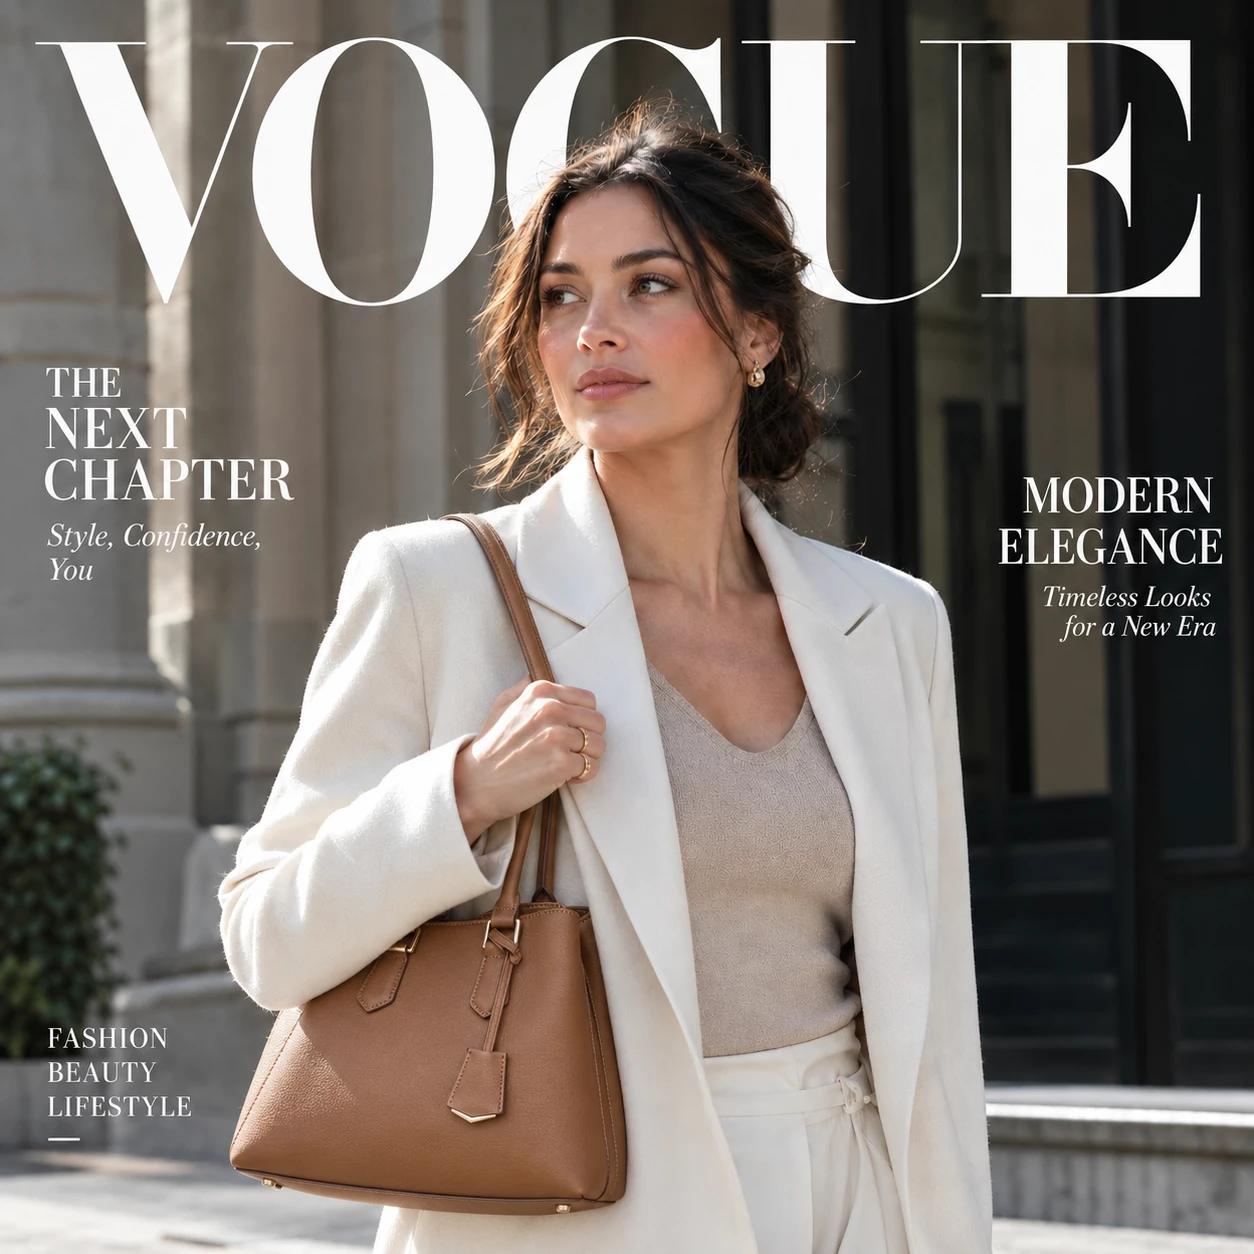
If the result needs adjustment, revise the part of the prompt related to the problem. Clarifying the target, reference, or preserved elements is usually more effective than adding unrelated details.
Edit or Replace Objects in an Image
Object-level edits work well when the overall image already looks right and only one element needs to change.
Remove Unwanted Objects
When removing an object, describe both what should disappear and how the exposed area should be rebuilt.
Prompt example:
Remove all background pedestrians visible behind the main subject. Fill the removed areas naturally so they blend with the surrounding street, pavement, architecture, lighting, perspective, and shadows. Keep the seated man and all non-pedestrian elements unchanged, including the red telephone booth, Big Ben, the red bus, the café table, and the foreground objects.
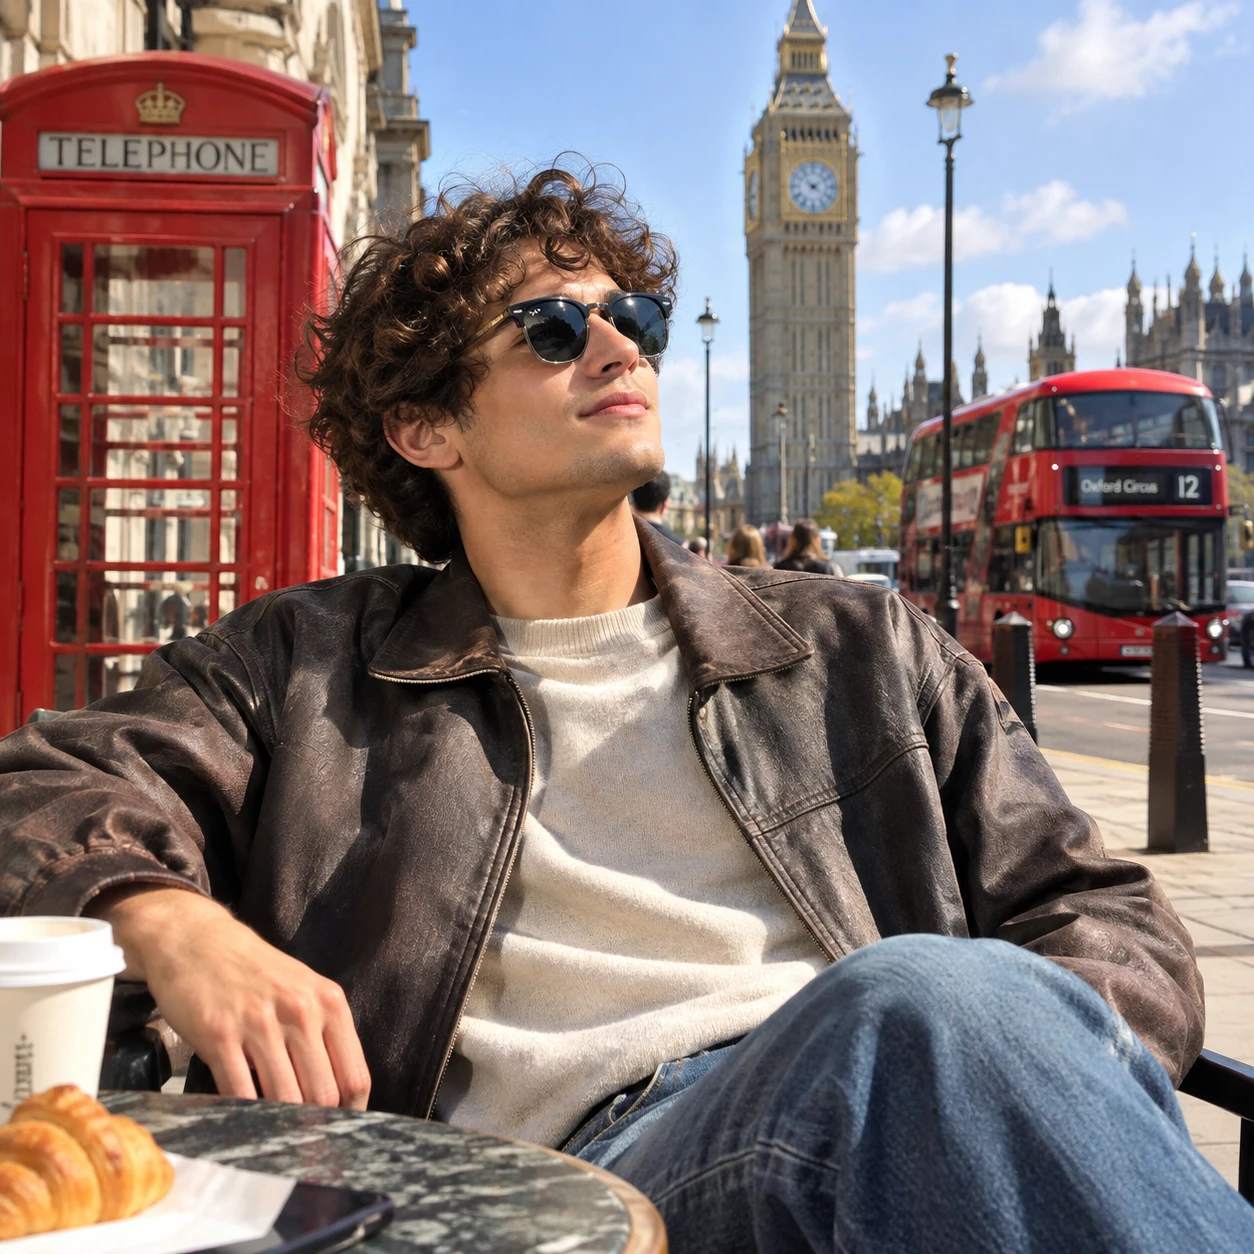
Before
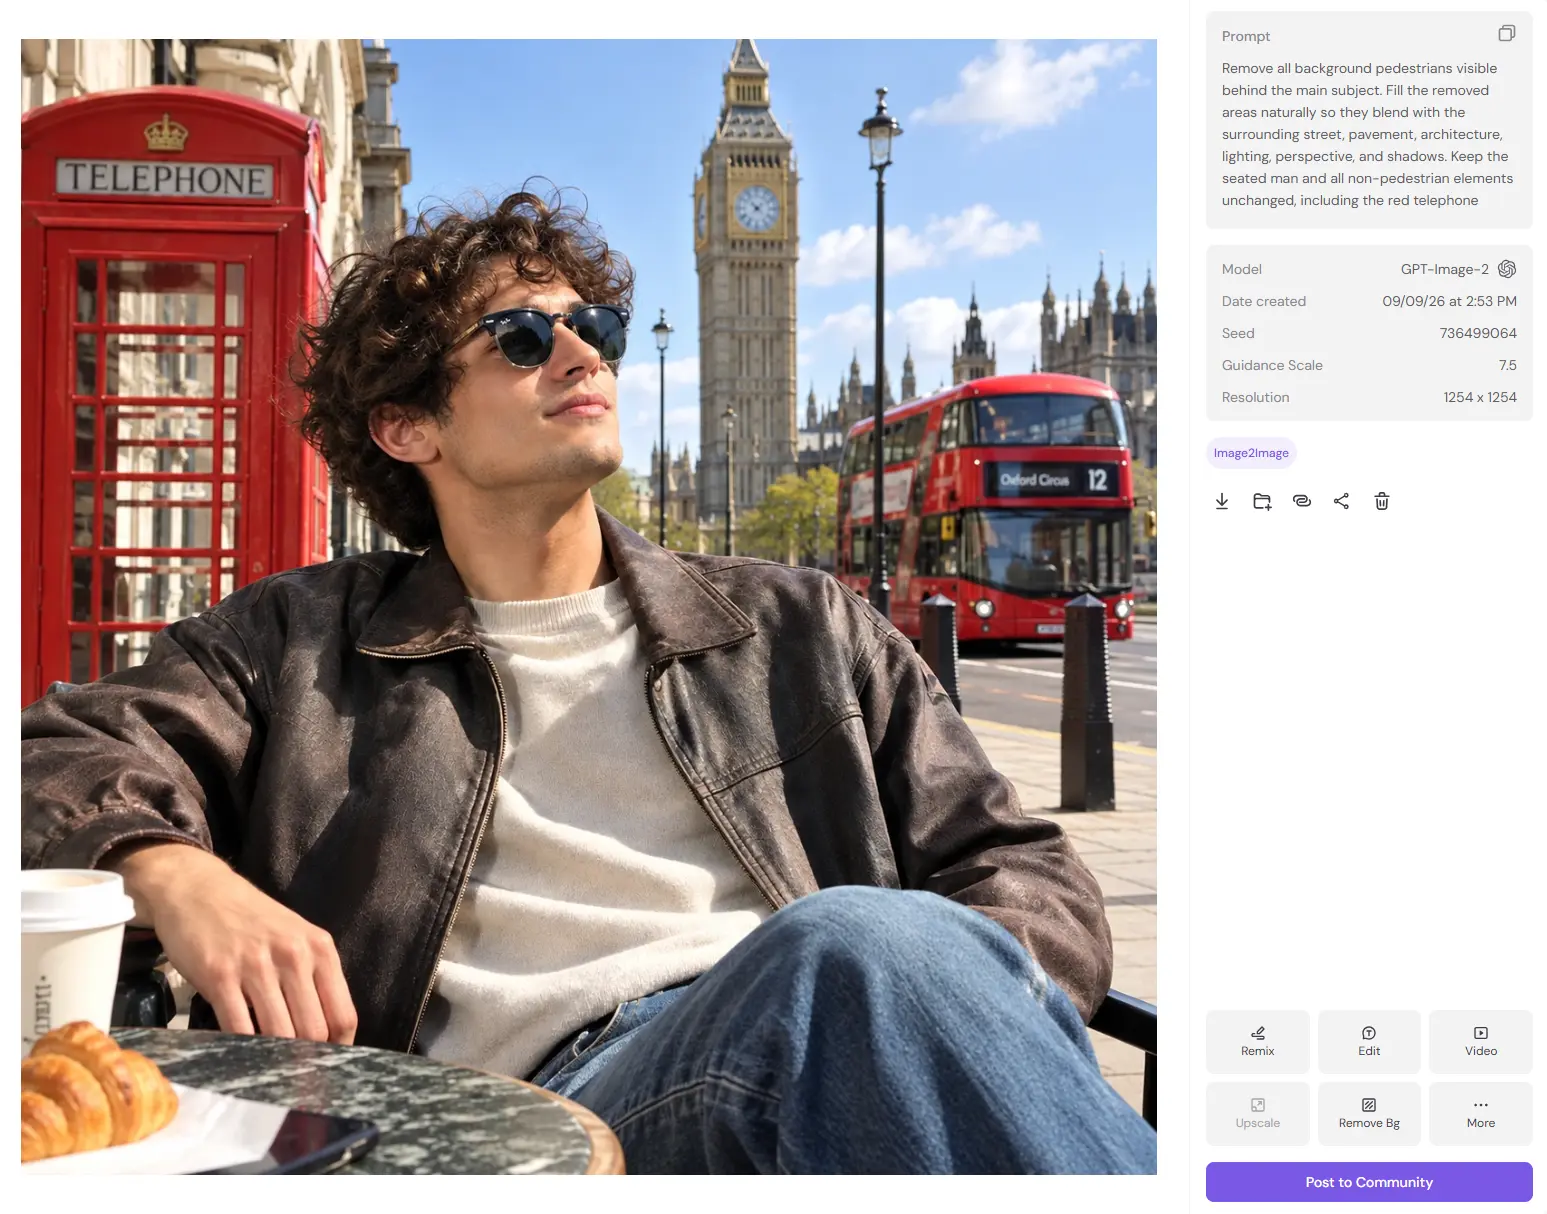
After
For larger objects, a short description of the surrounding environment can help the model rebuild the missing area more naturally.
Replace an Object or Product
Use a reference image when the replacement needs to match a specific design.
For example:
Image 1: Original lifestyle image
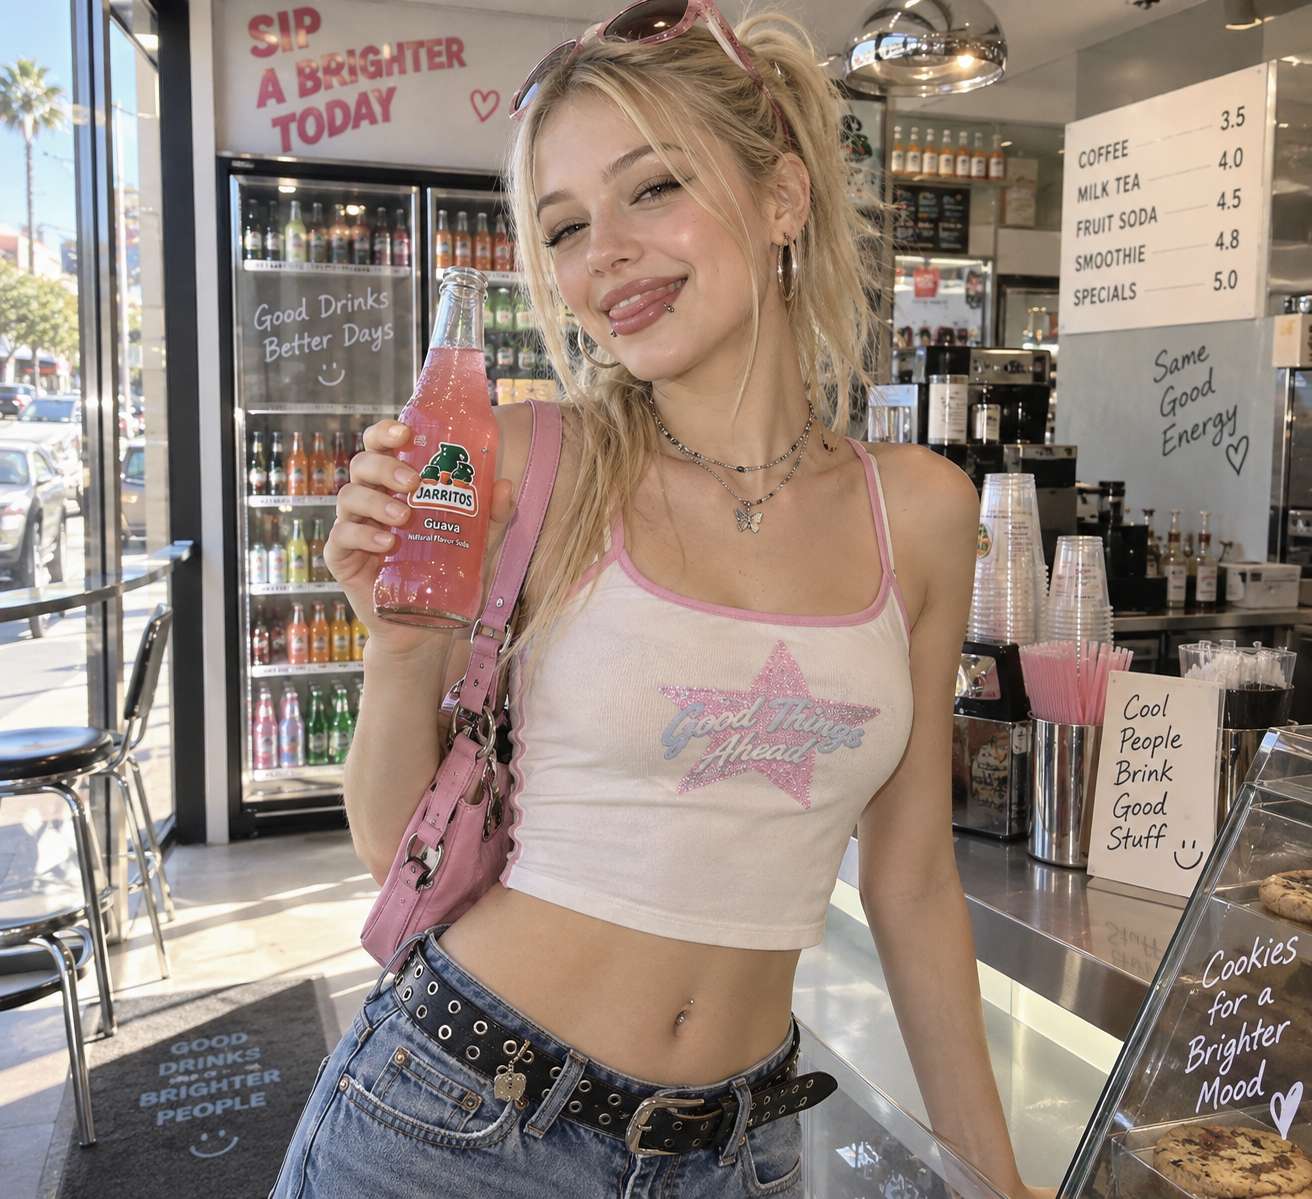
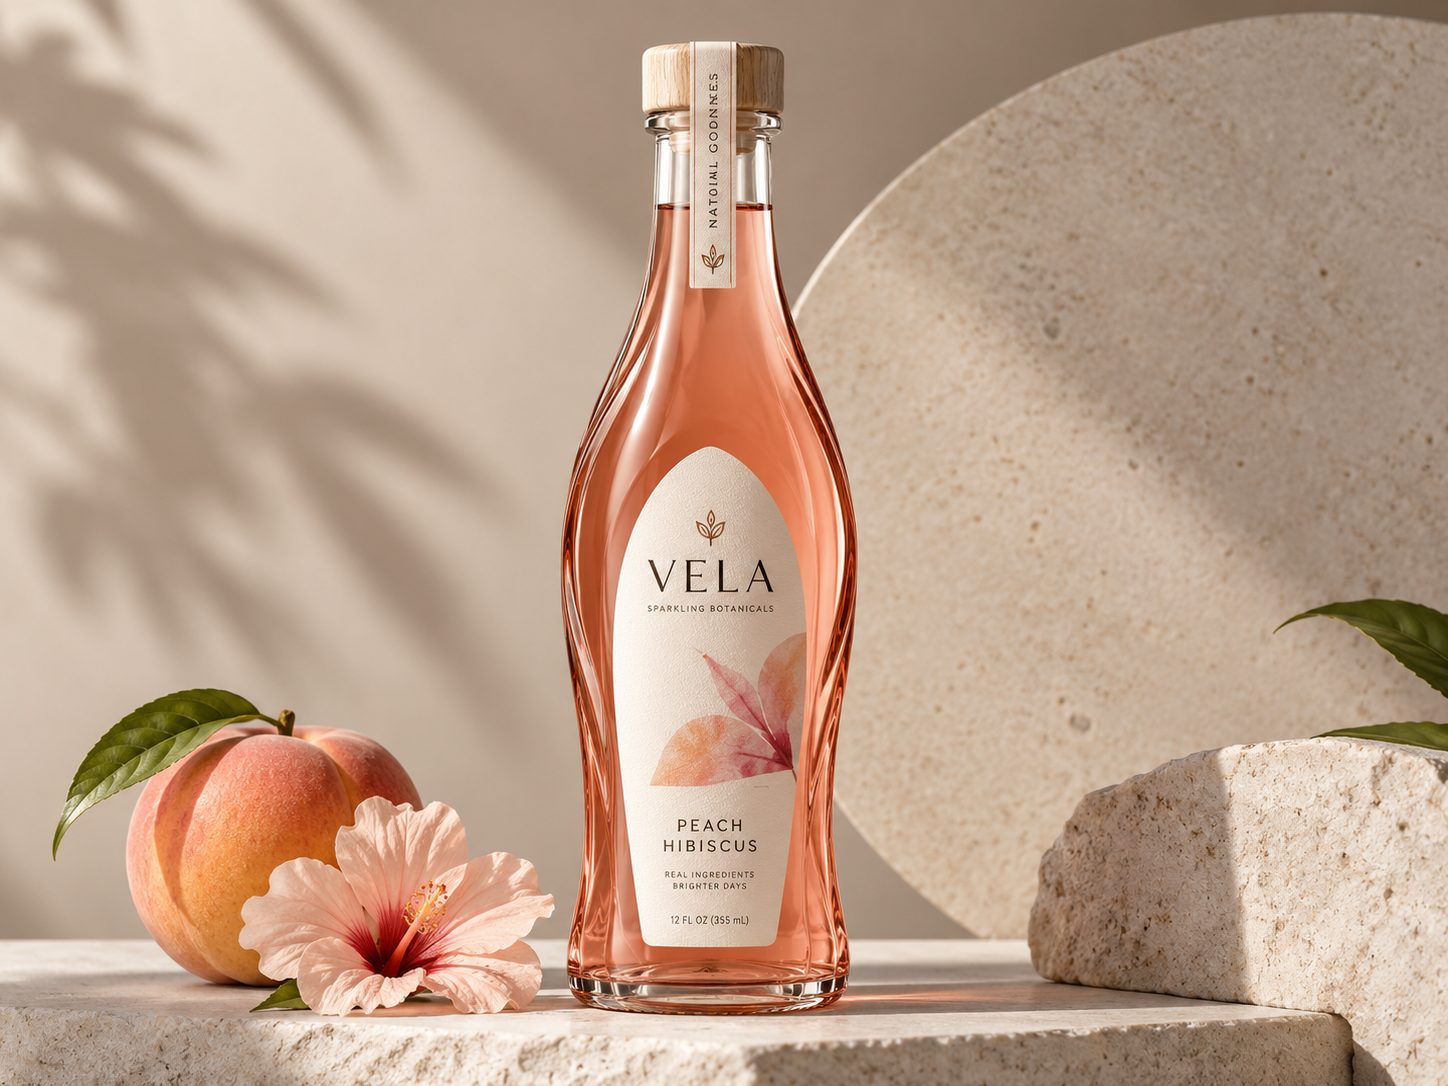
Image 2: Product reference
Prompt example:
Replace only the bottle in the woman's hand with the product shown in Image 2. Preserve the product's packaging shape, label design, colors, and proportions. Match the scale, perspective, lighting, reflections, and hand contact naturally. Keep the woman, pose, background, and camera framing unchanged.
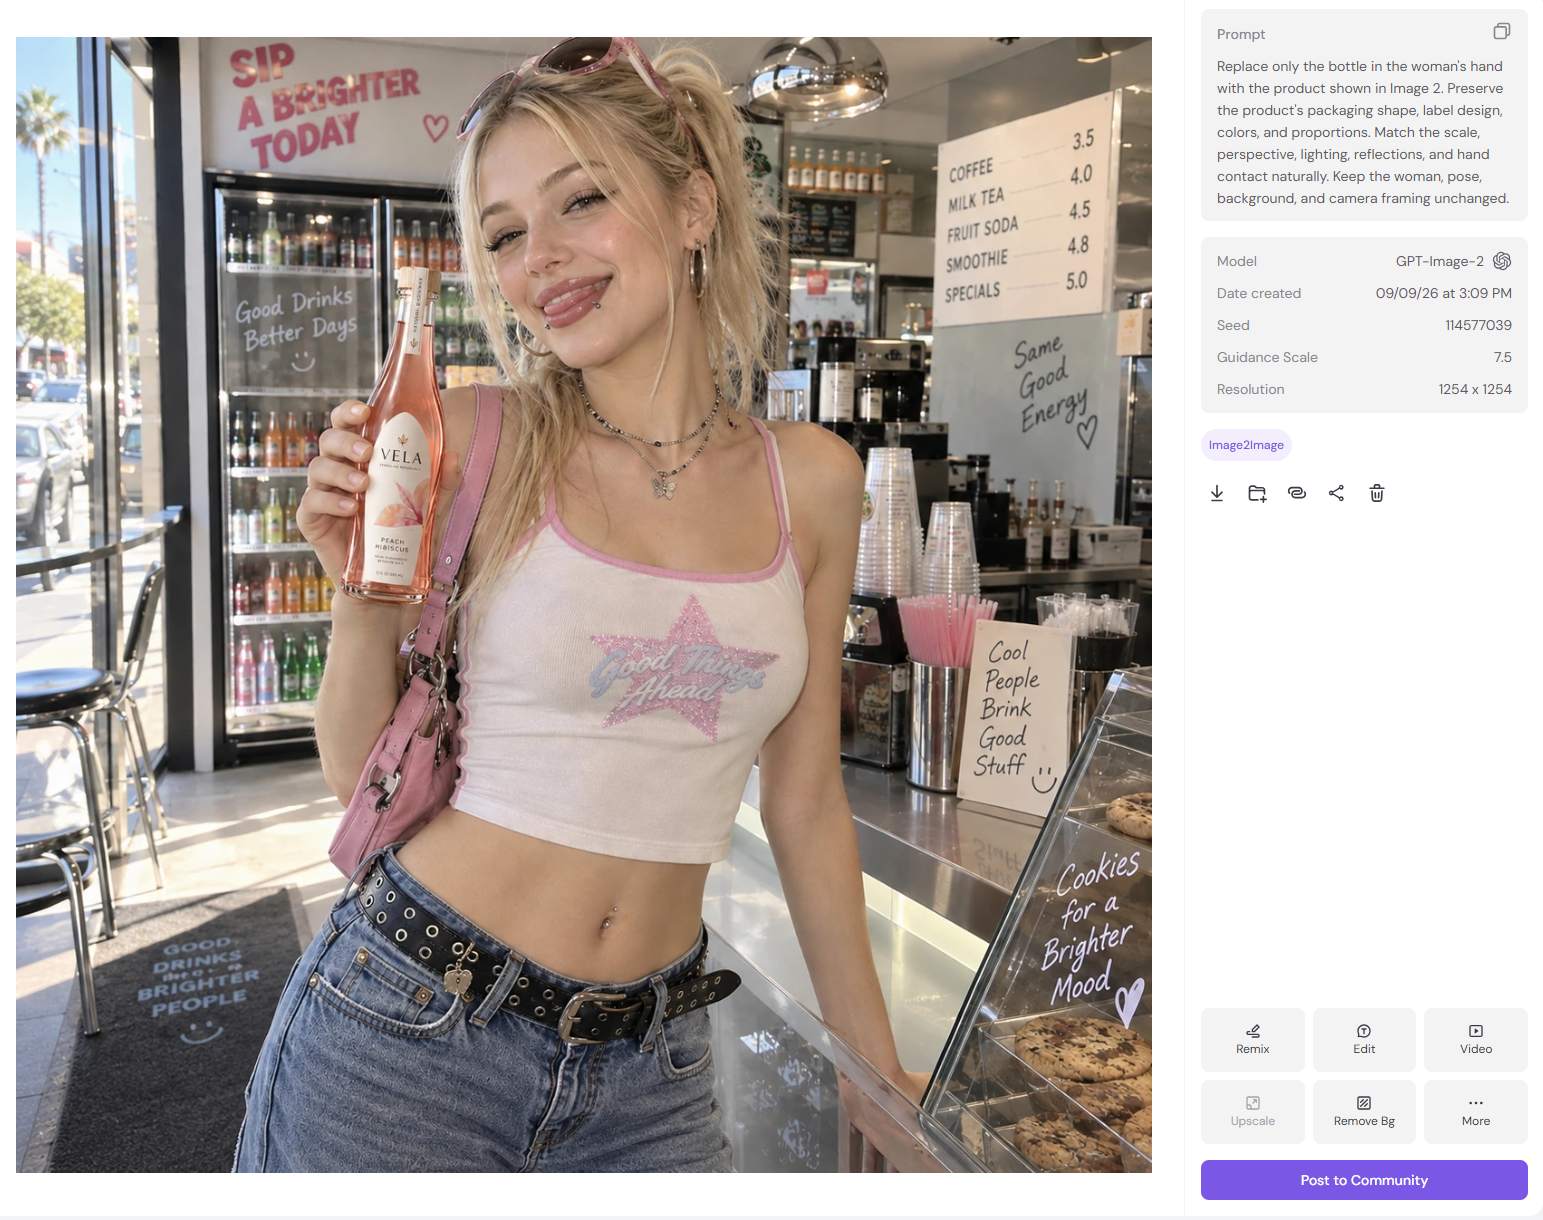
For branded products, specify the details that matter most, such as packaging shape, label placement, cap design, colors, and proportions.
Change the Background or Scene
Background editing can range from replacing a backdrop to placing the same subject in a completely different environment.
Replace the Background
Describe the new environment and identify the subject details that should stay unchanged.
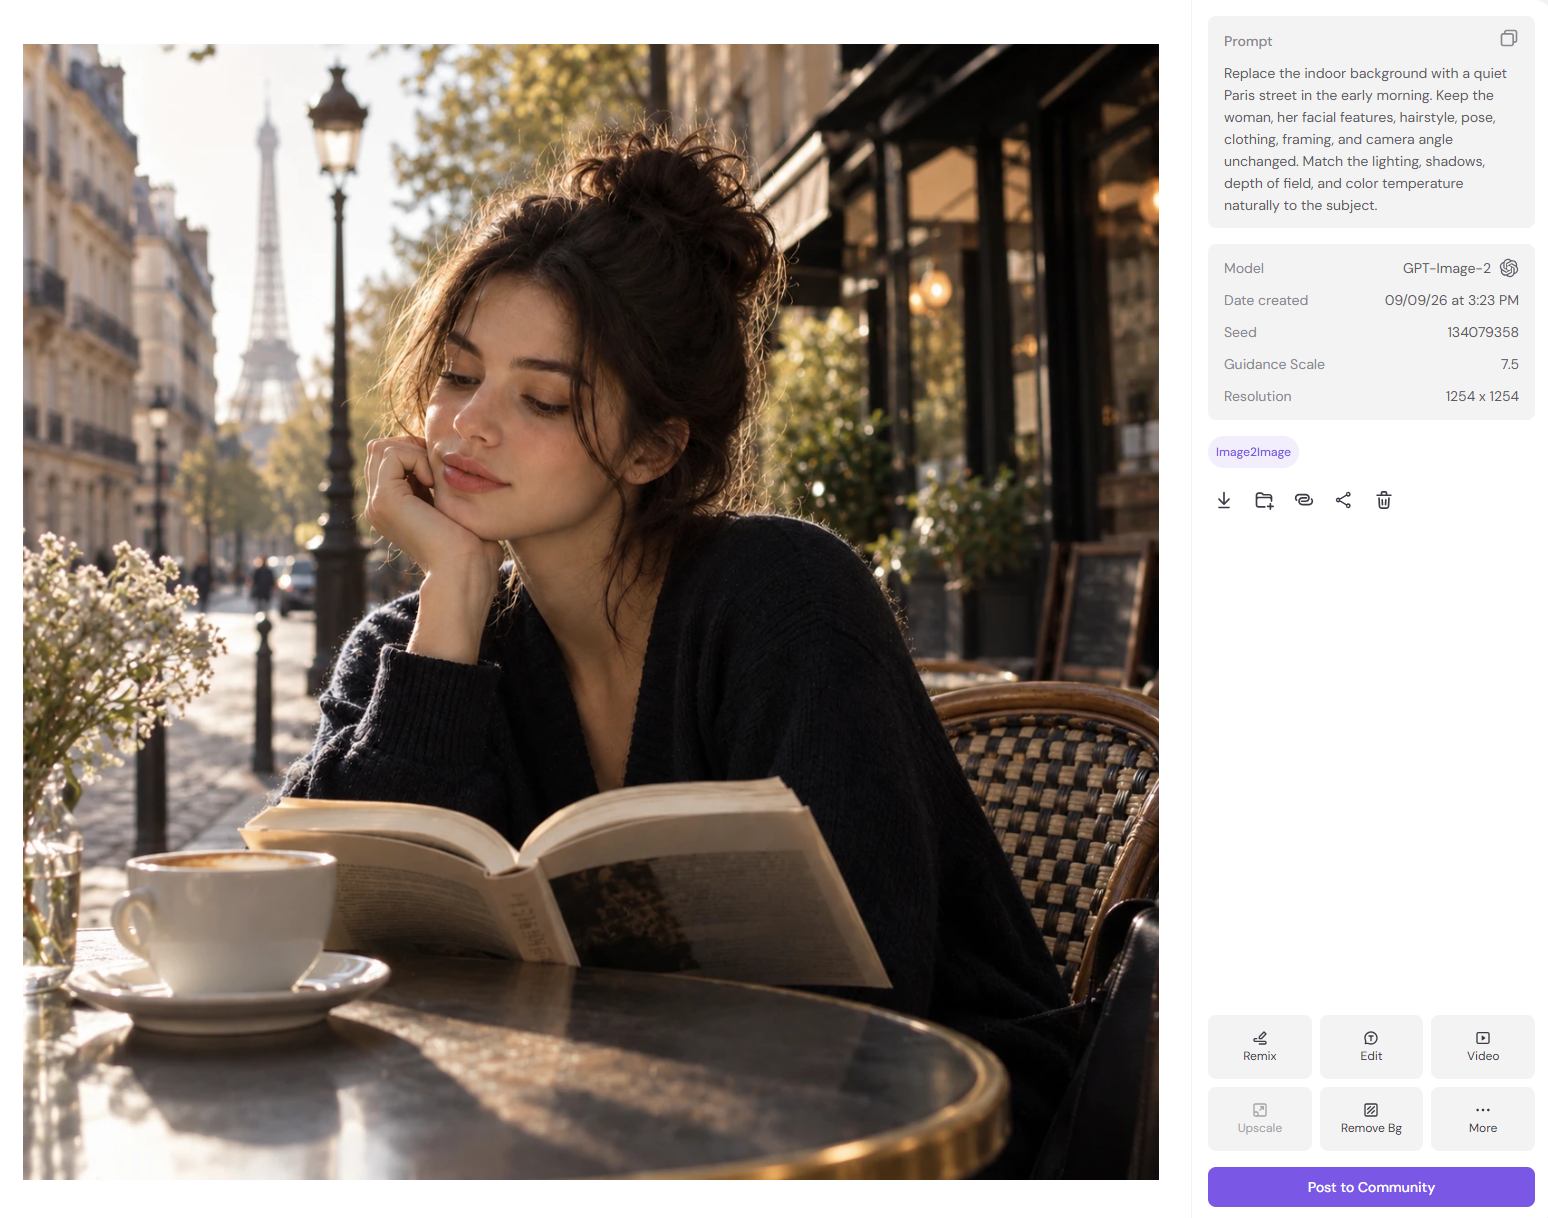
Prompt example:
Replace the indoor background with a quiet Paris street in the early morning. Keep the woman, her facial features, hairstyle, pose, clothing, framing, and camera angle unchanged. Match the lighting, shadows, depth of field, and color temperature naturally to the subject.
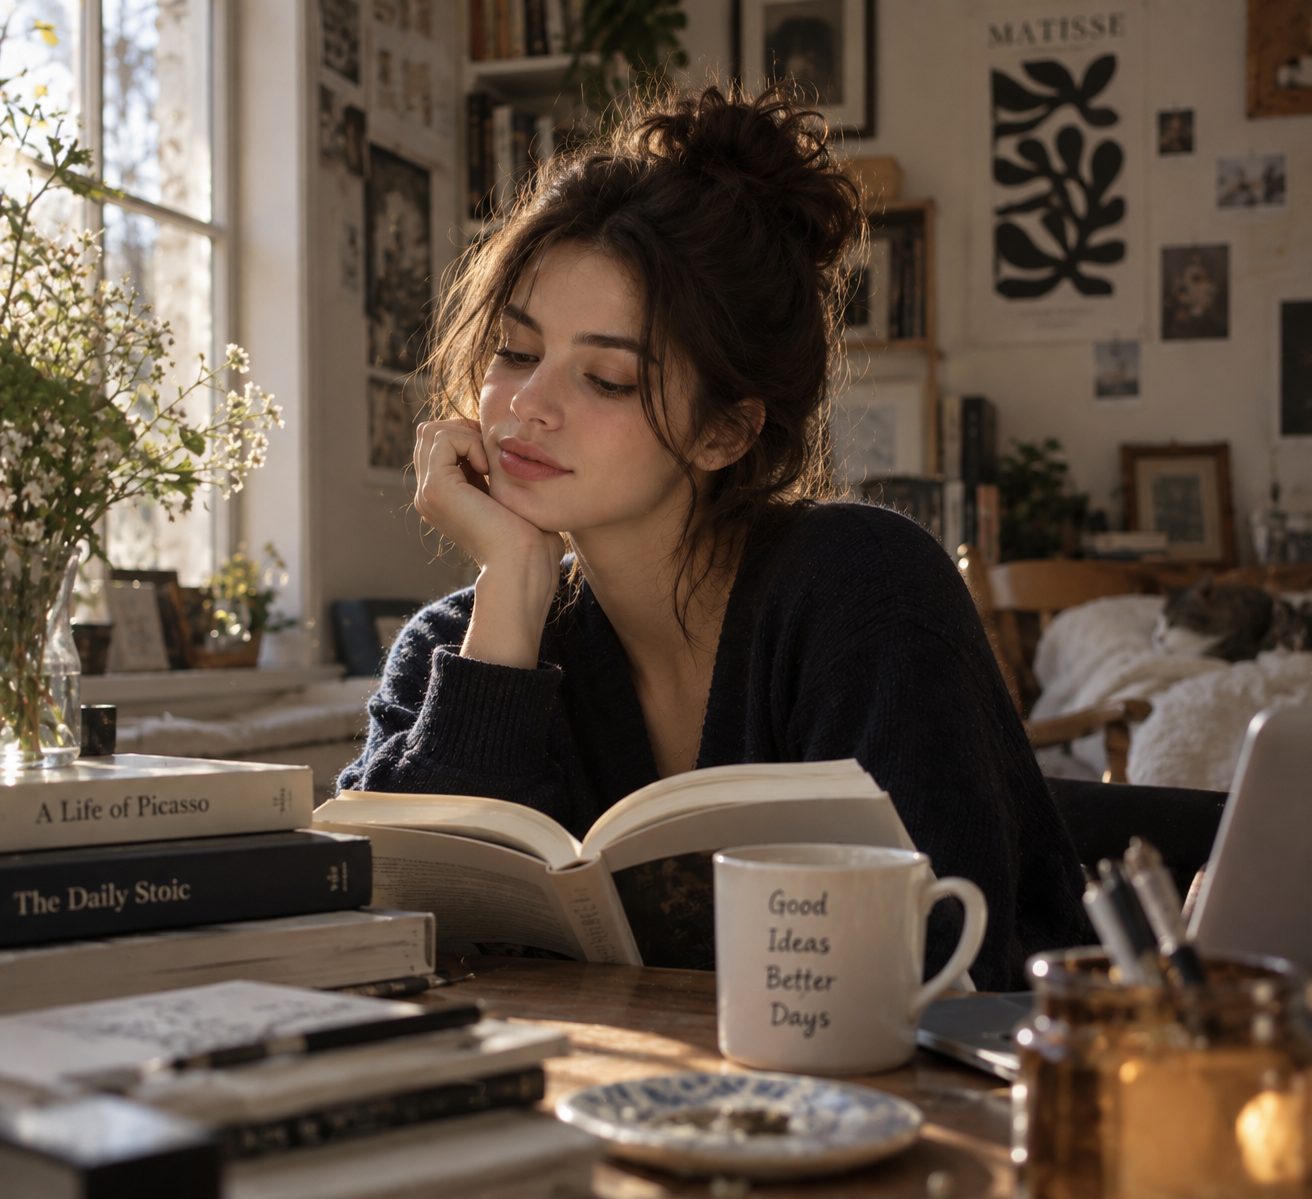
Before
After
A convincing result depends on the subject and background sharing the same lighting, perspective, and depth.
Keep the Subject and Move Them Into a New Scene
If the goal is to preserve the same person across several images, define the appearance details that should remain consistent.
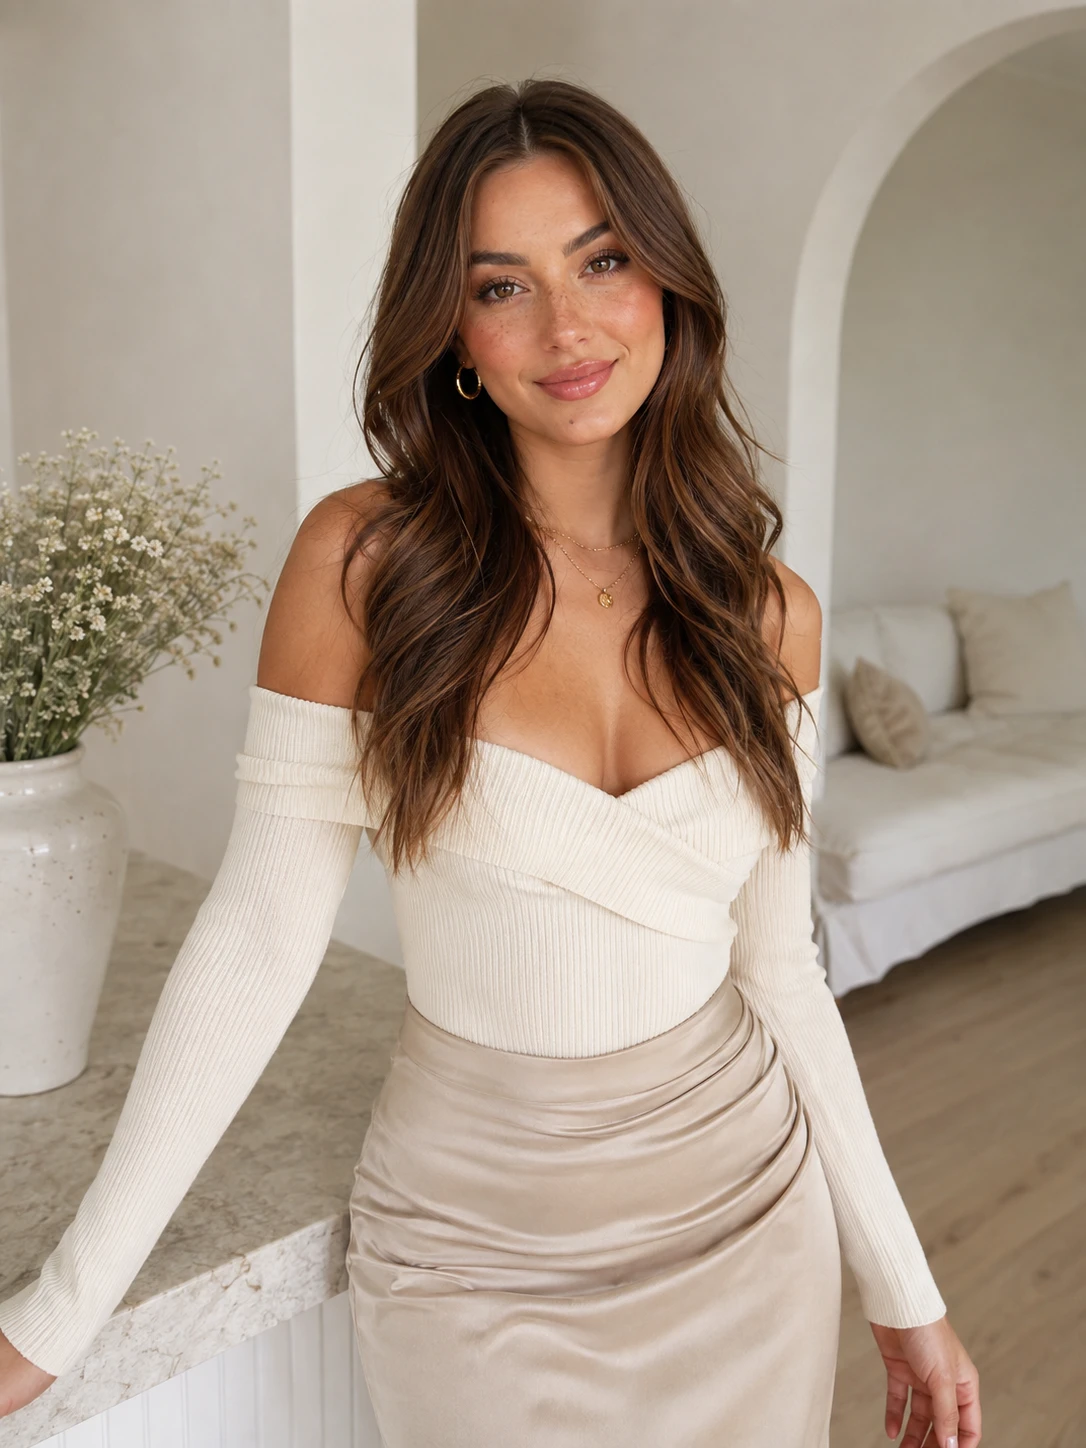
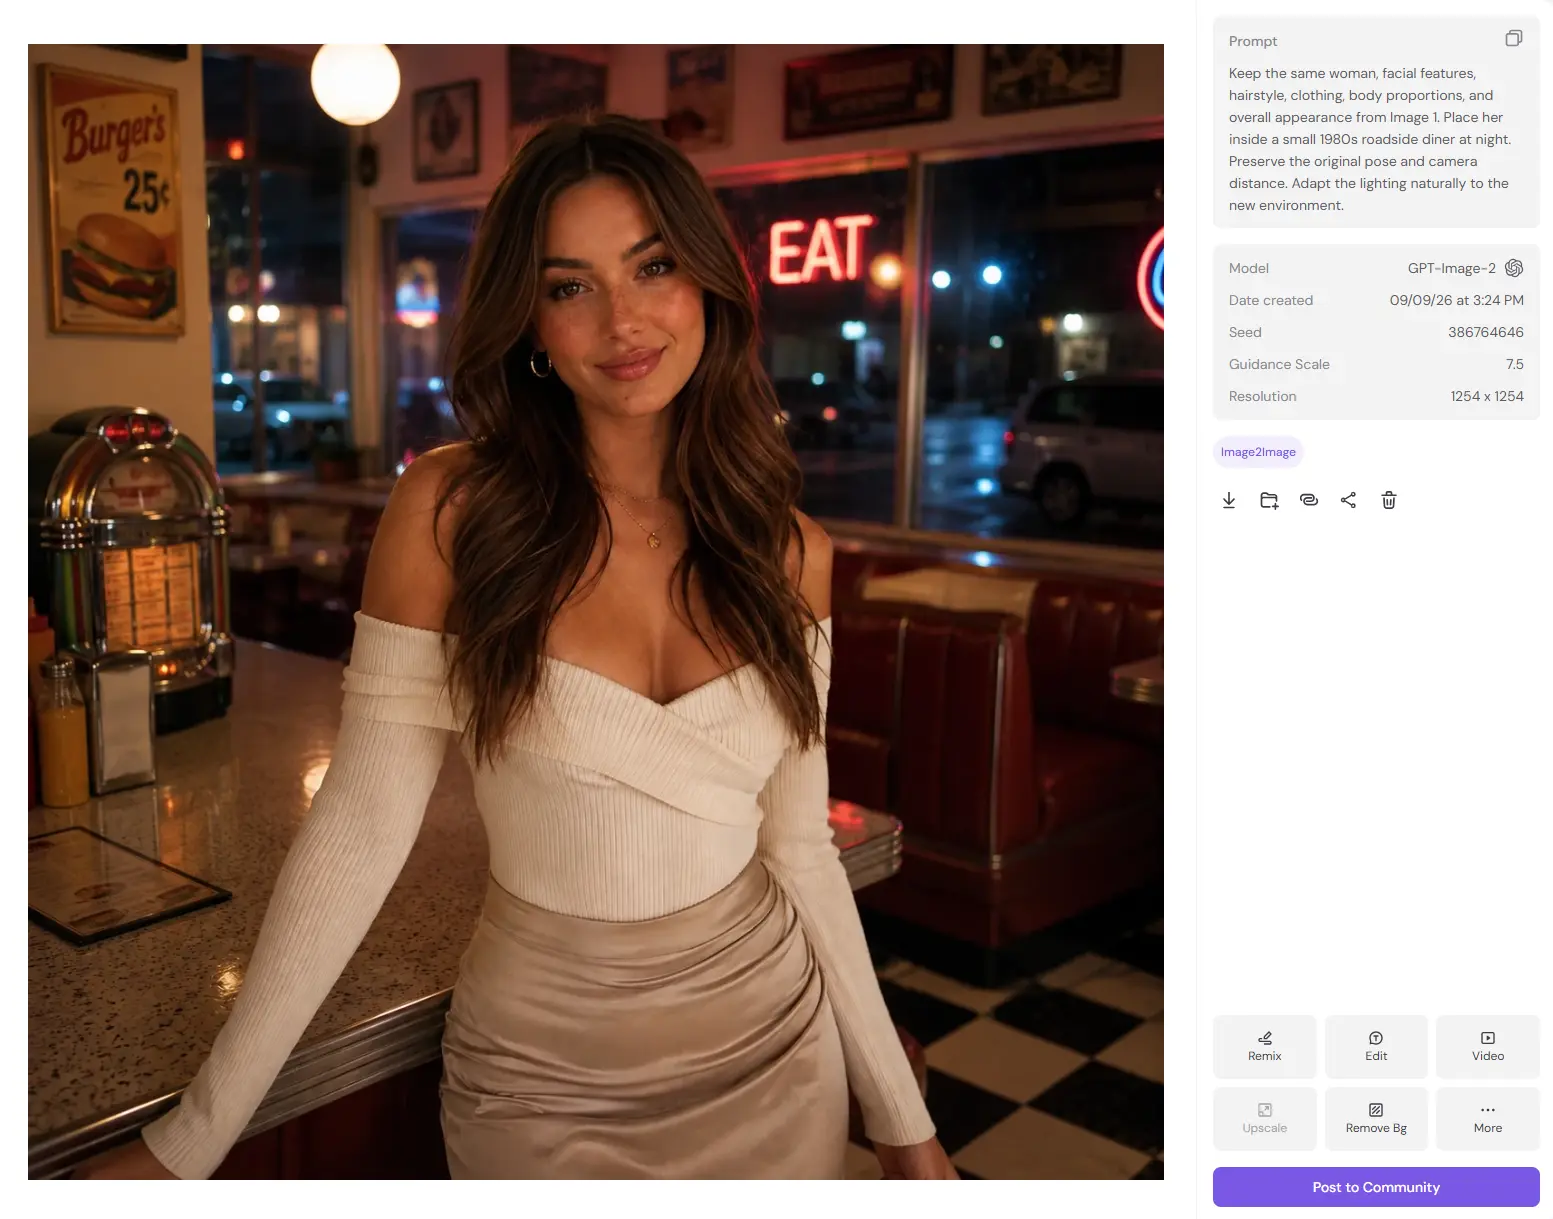
Prompt example:
Keep the same woman, facial features, hairstyle, clothing, body proportions, and overall appearance from Image 1. Place her inside a small 1980s roadside diner at night. Preserve the original pose and camera distance. Adapt the lighting naturally to the new environment.
Before
After
This approach works well for character-based visual series and campaign concepts.
Edit Clothing, Colors, and Visual Details
Smaller edits can be handled without changing the overall composition.
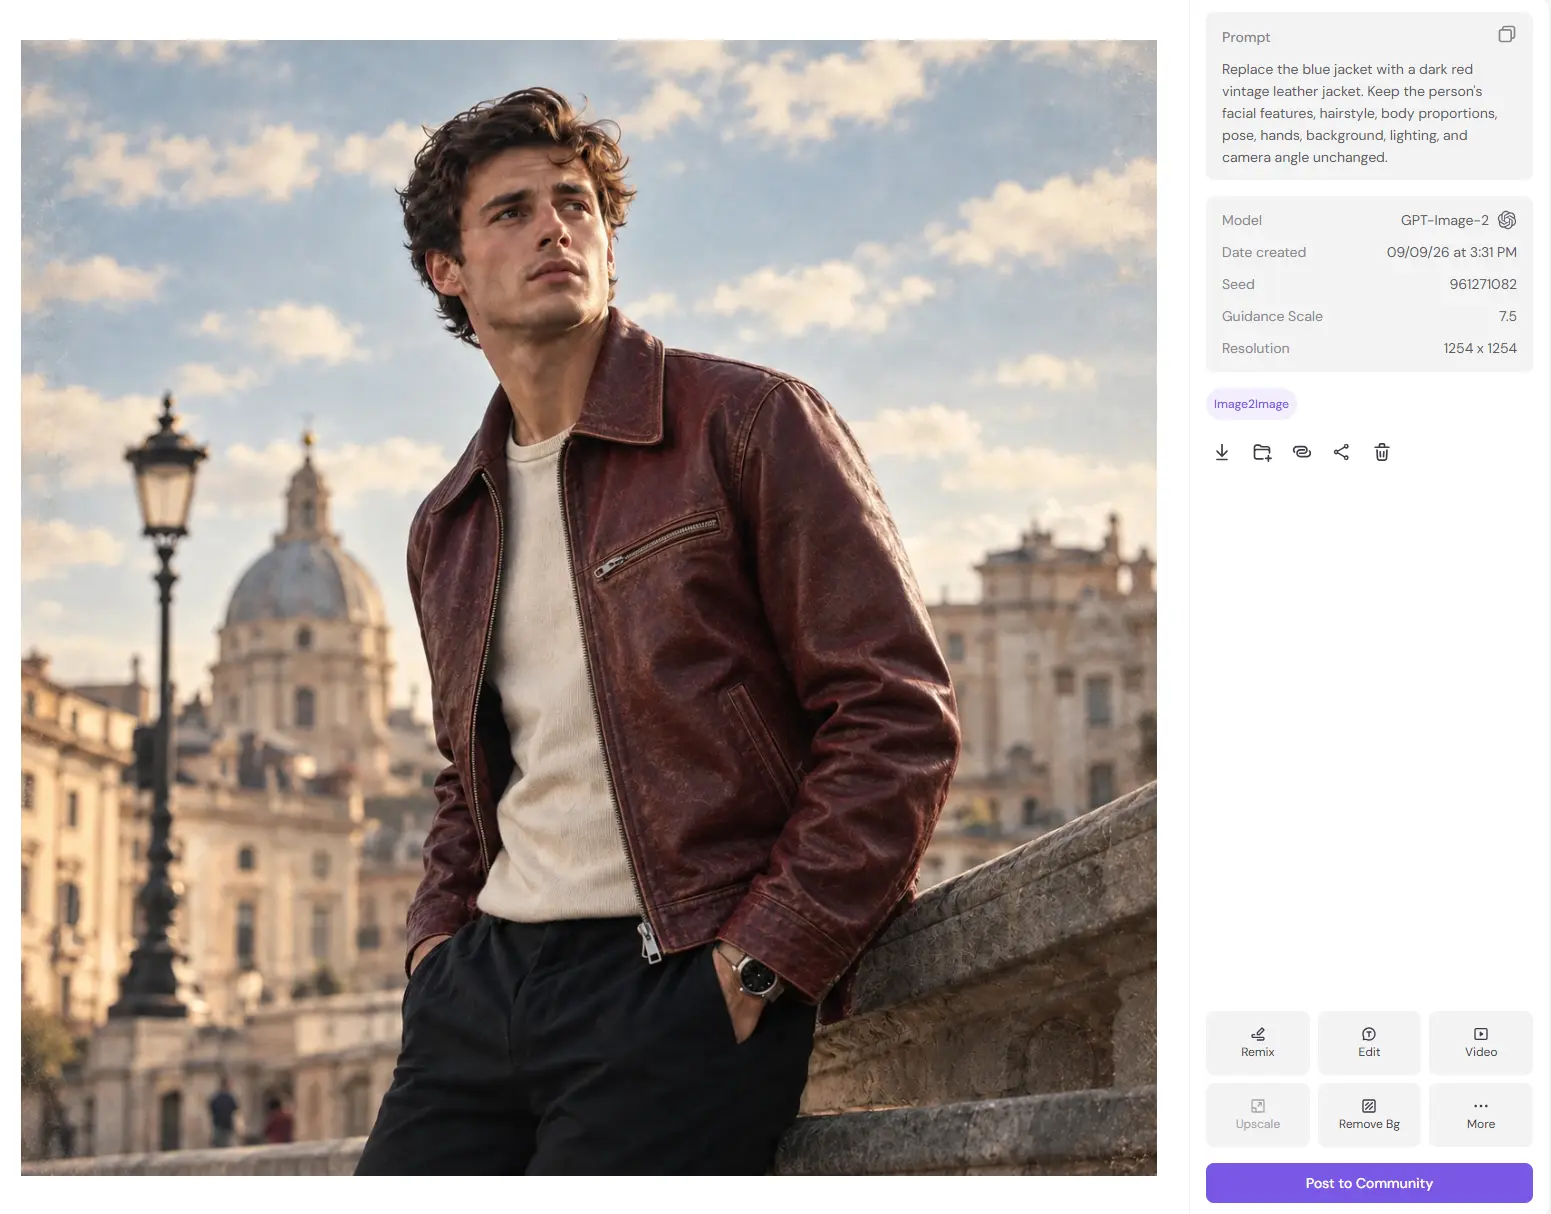
Change an Outfit
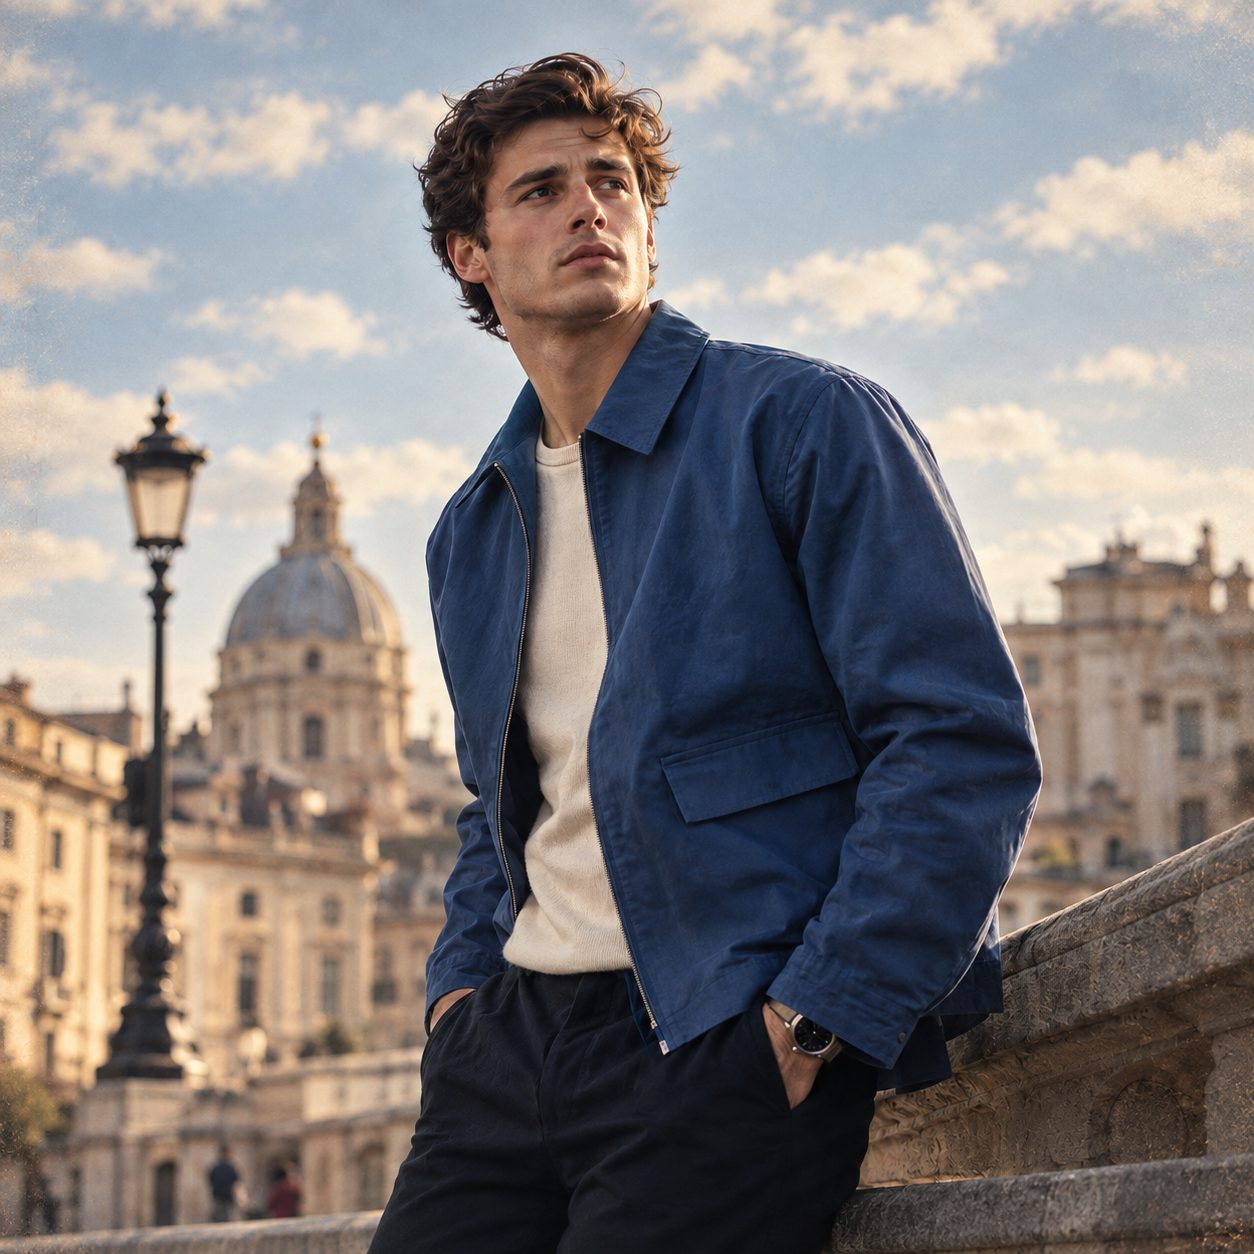
Prompt example:
Replace the blue jacket with a dark red vintage leather jacket. Keep the person's facial features, hairstyle, body proportions, pose, hands, background, lighting, and camera angle unchanged.
Before
After
When editing clothing, preserving the pose, hands, and body shape helps keep the original image stable.
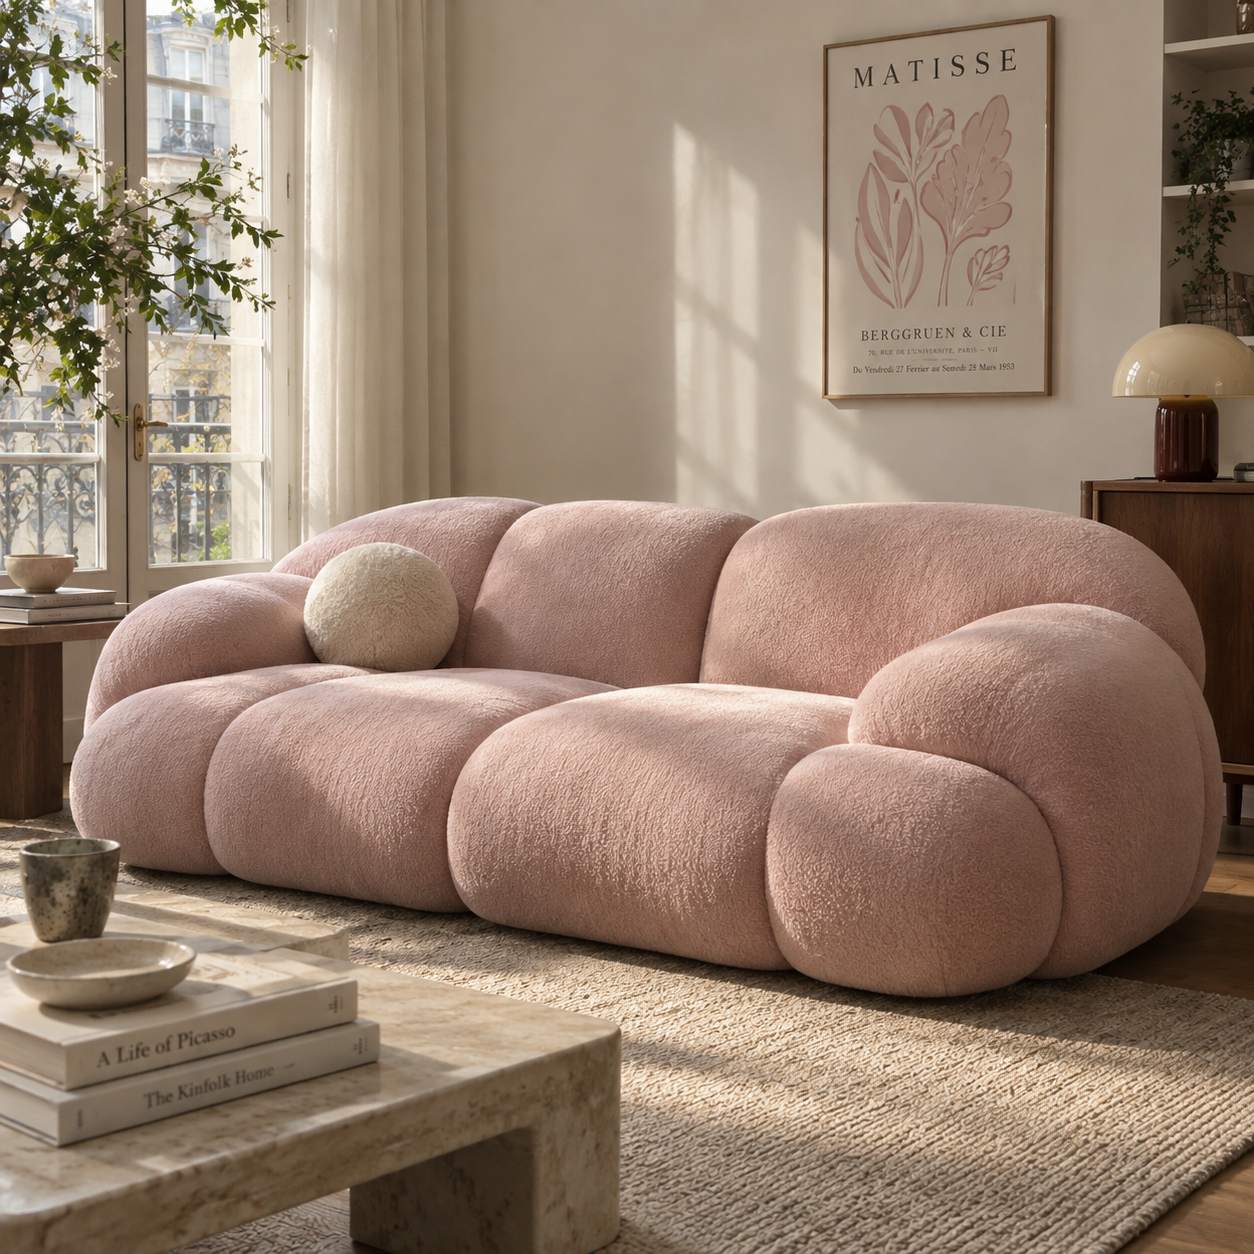
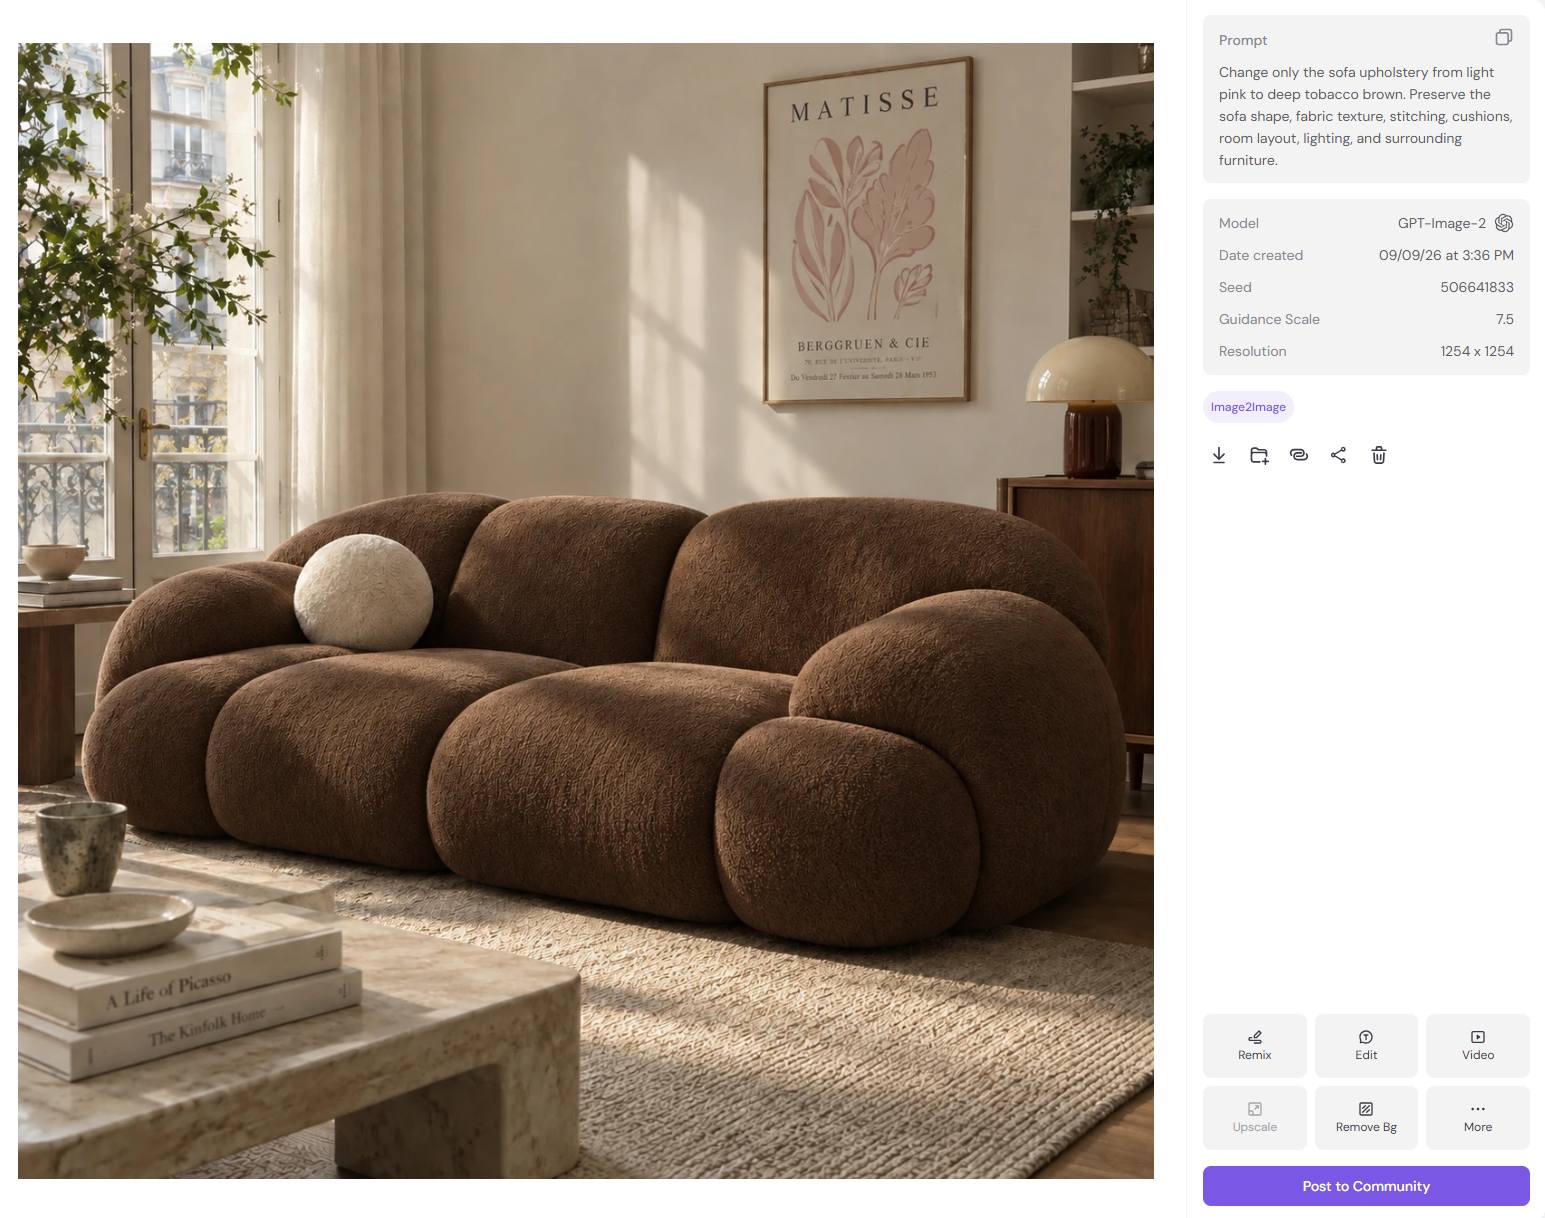
Change the Color of an Object
When changing color, specify which material and structural details should remain.
Prompt example:
Change only the sofa upholstery from light pink to deep tobacco brown. Preserve the sofa shape, fabric texture, stitching, cushions, room layout, lighting, and surrounding furniture.
Before
After
The same structure can be used for furniture, clothing, cars, packaging, and accessories.
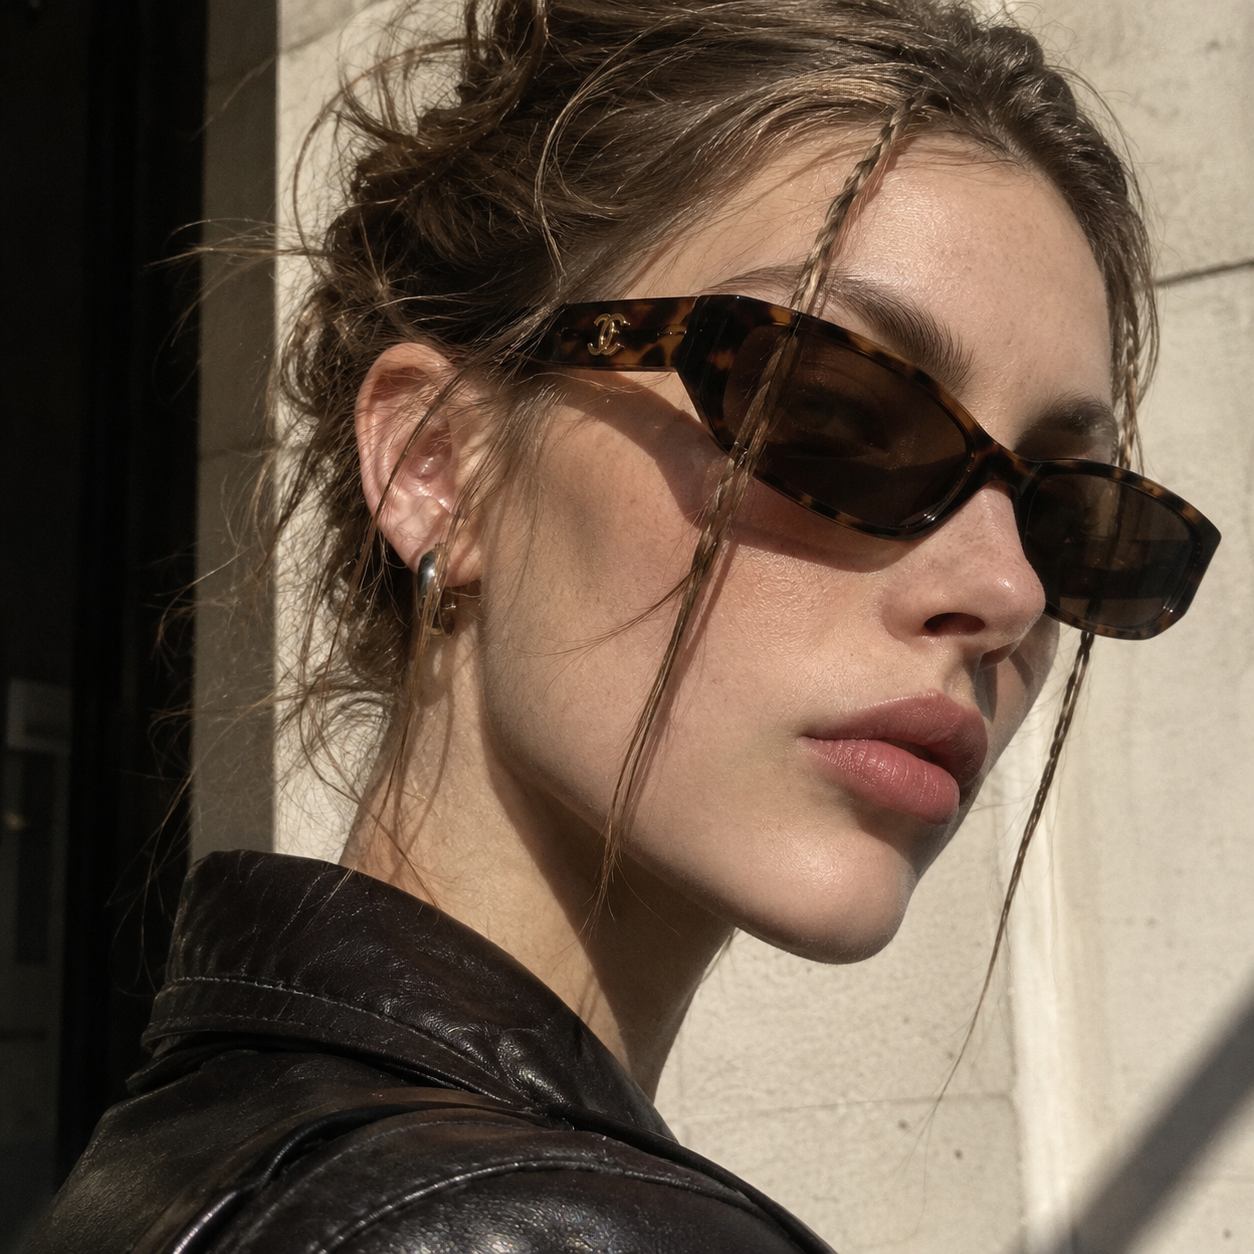
Replace Small Details or Accessories
For smaller edits, keep the instruction focused on one element.
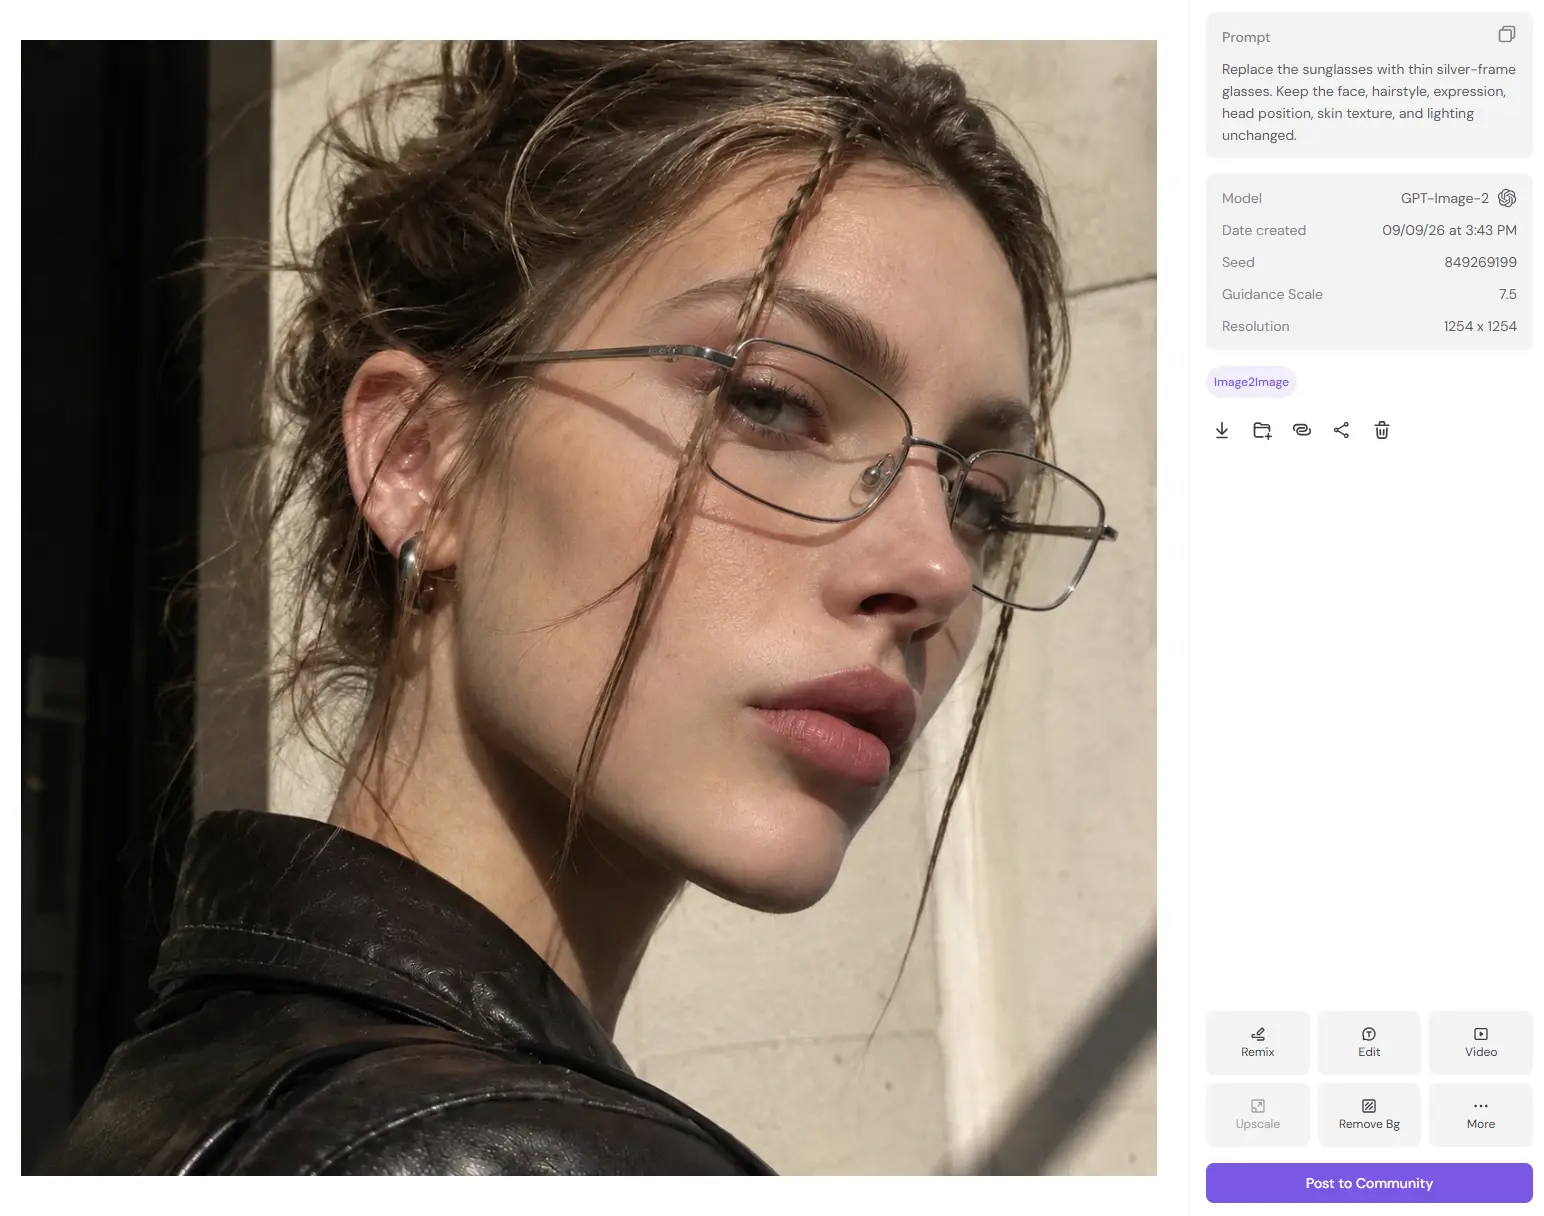
Prompt example:
Replace the sunglasses with thin silver-frame glasses. Keep the face, hairstyle, expression, head position, skin texture, and lighting unchanged.
Before
After
Phrases such as "replace only" and "change only" help keep the edit contained.
Combine Multiple Images With AI
Multiple references can be used to build a new composition from separate subjects, products, and environments.
Give each reference a clear role so the model knows how to use it.
Combine a Character, Product, and Background
Example setup:
Image 1: Character
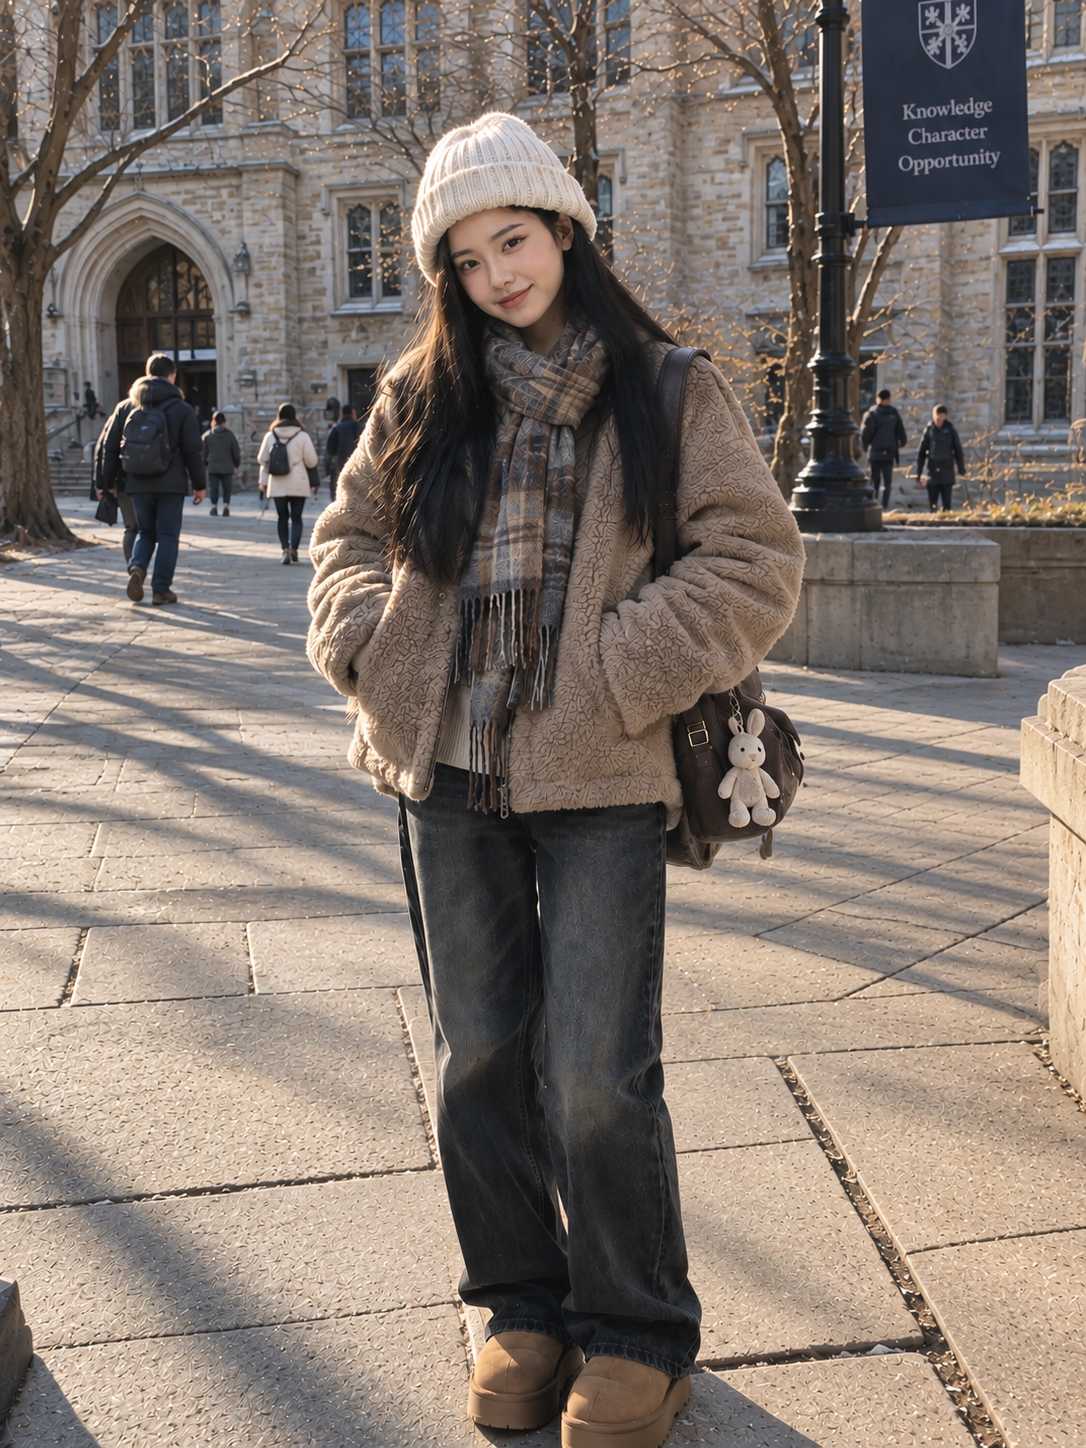
Image 2: Product
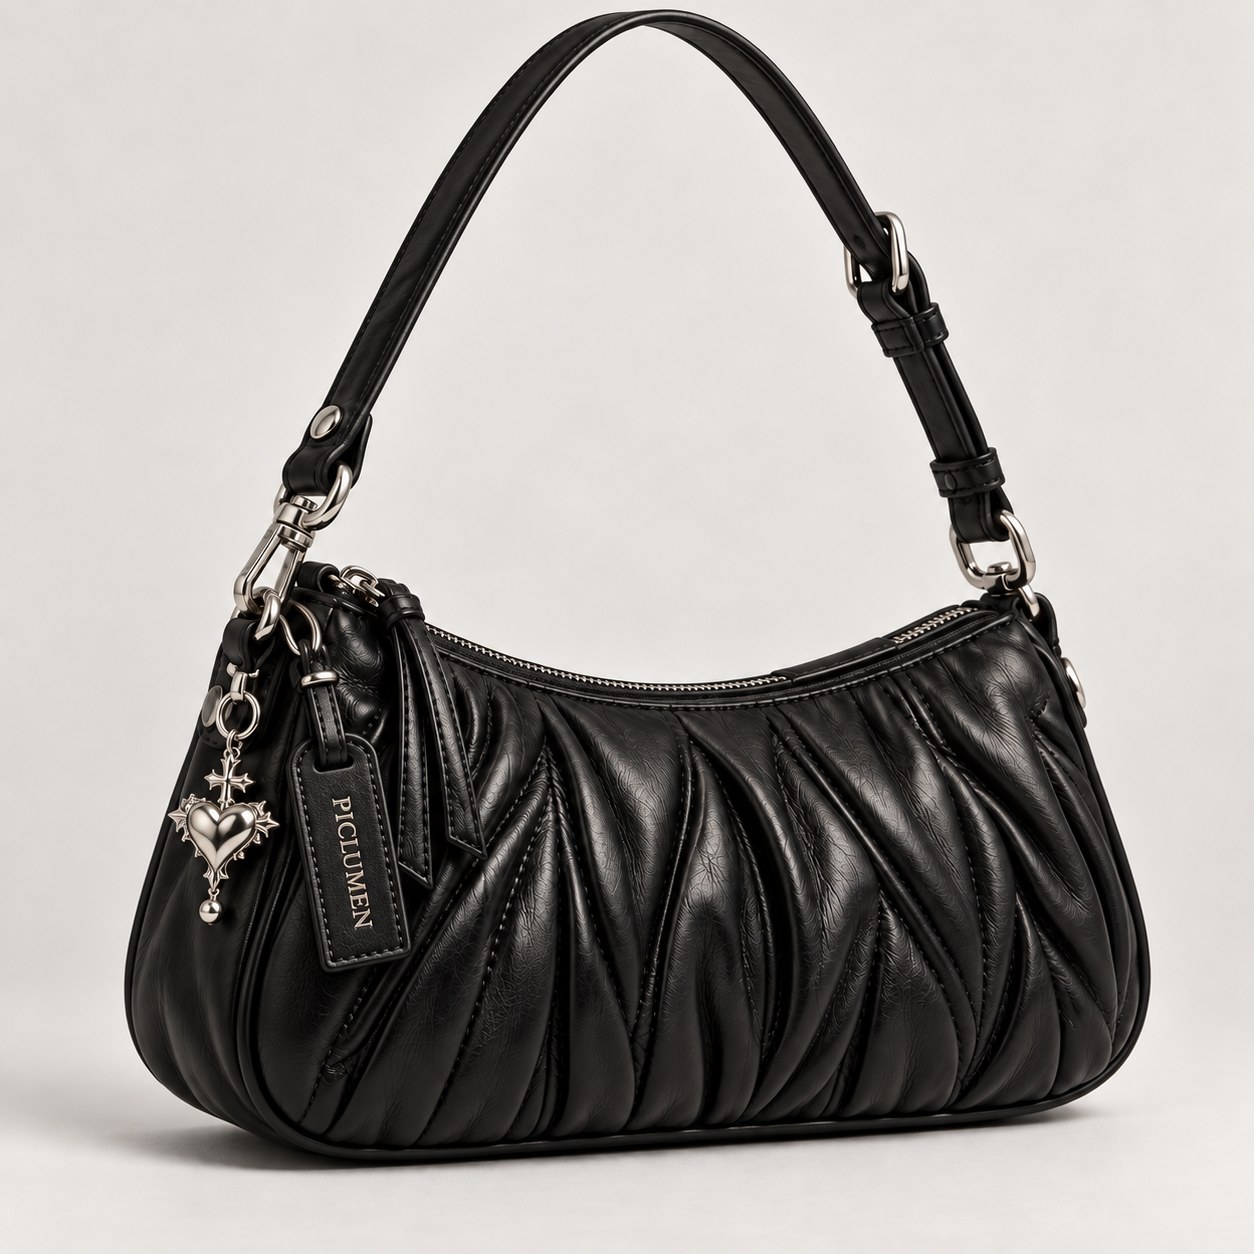
Image 3: Environment
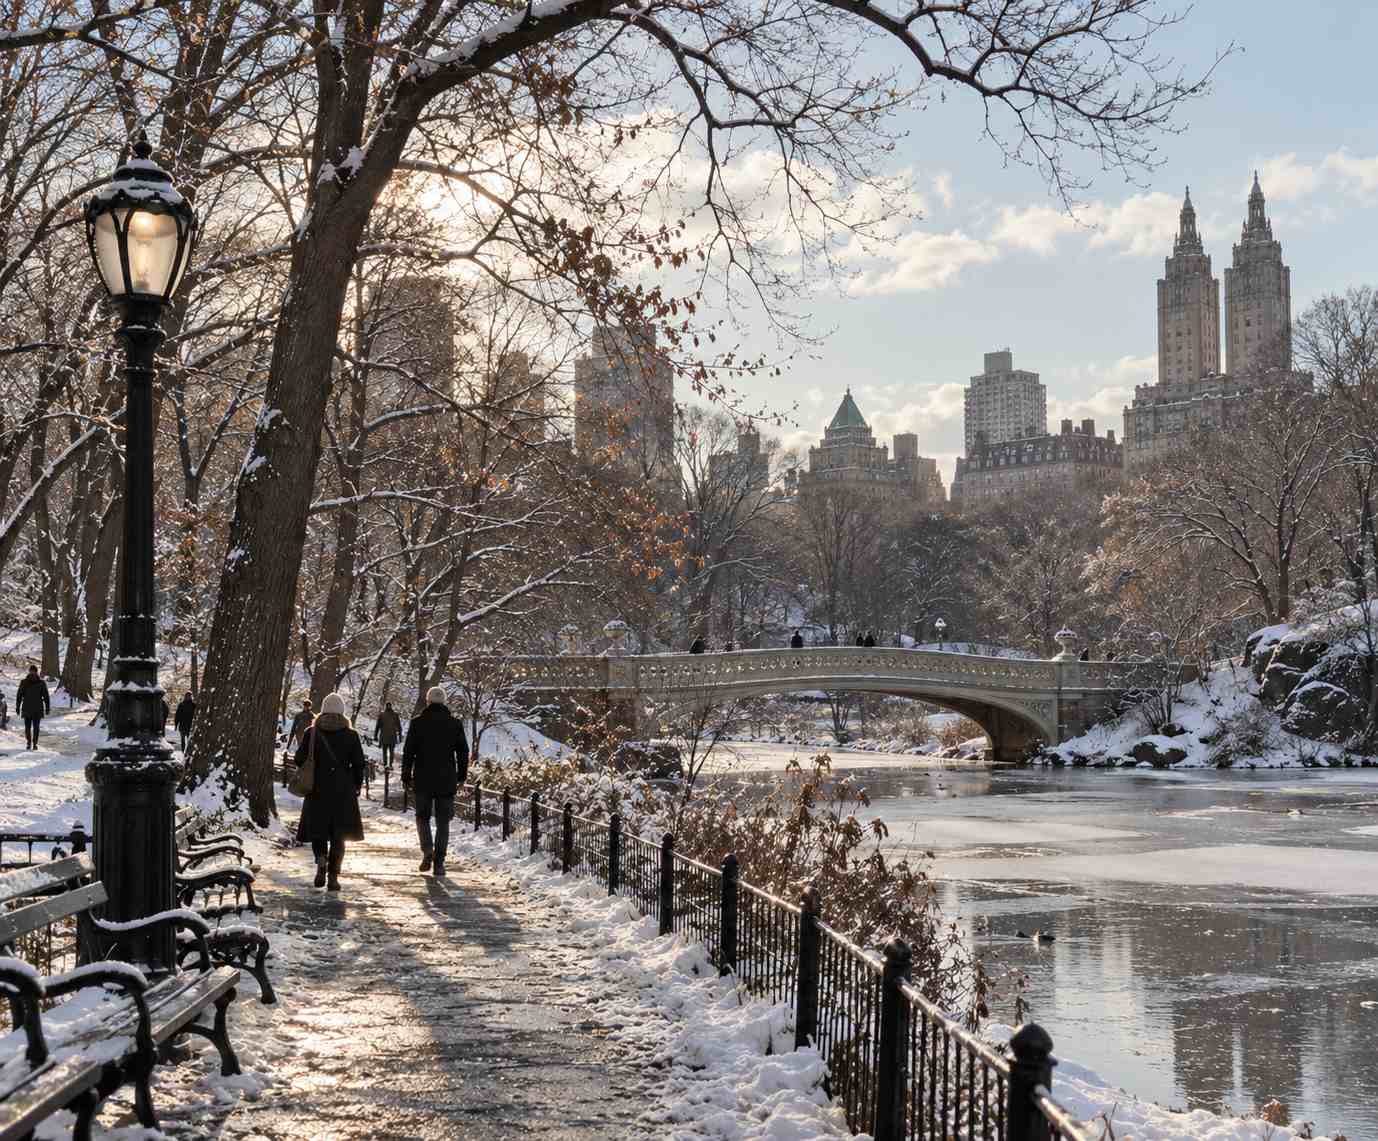
Prompt example:
Use the woman from Image 1 as the main subject. Place the product from Image 2 naturally in her right hand and use Image 3 as the environment. Preserve the woman's facial features, hairstyle, outfit, and body proportions. Preserve the product's design, packaging, colors, and label placement. Match the lighting, perspective, scale, shadows, and depth of field across the whole scene.
Clear reference roles are more reliable than a general instruction such as “combine these images.”
Combine Two Subjects Into One Scene
Two people from separate images can also be placed into the same environment.
Example setup:
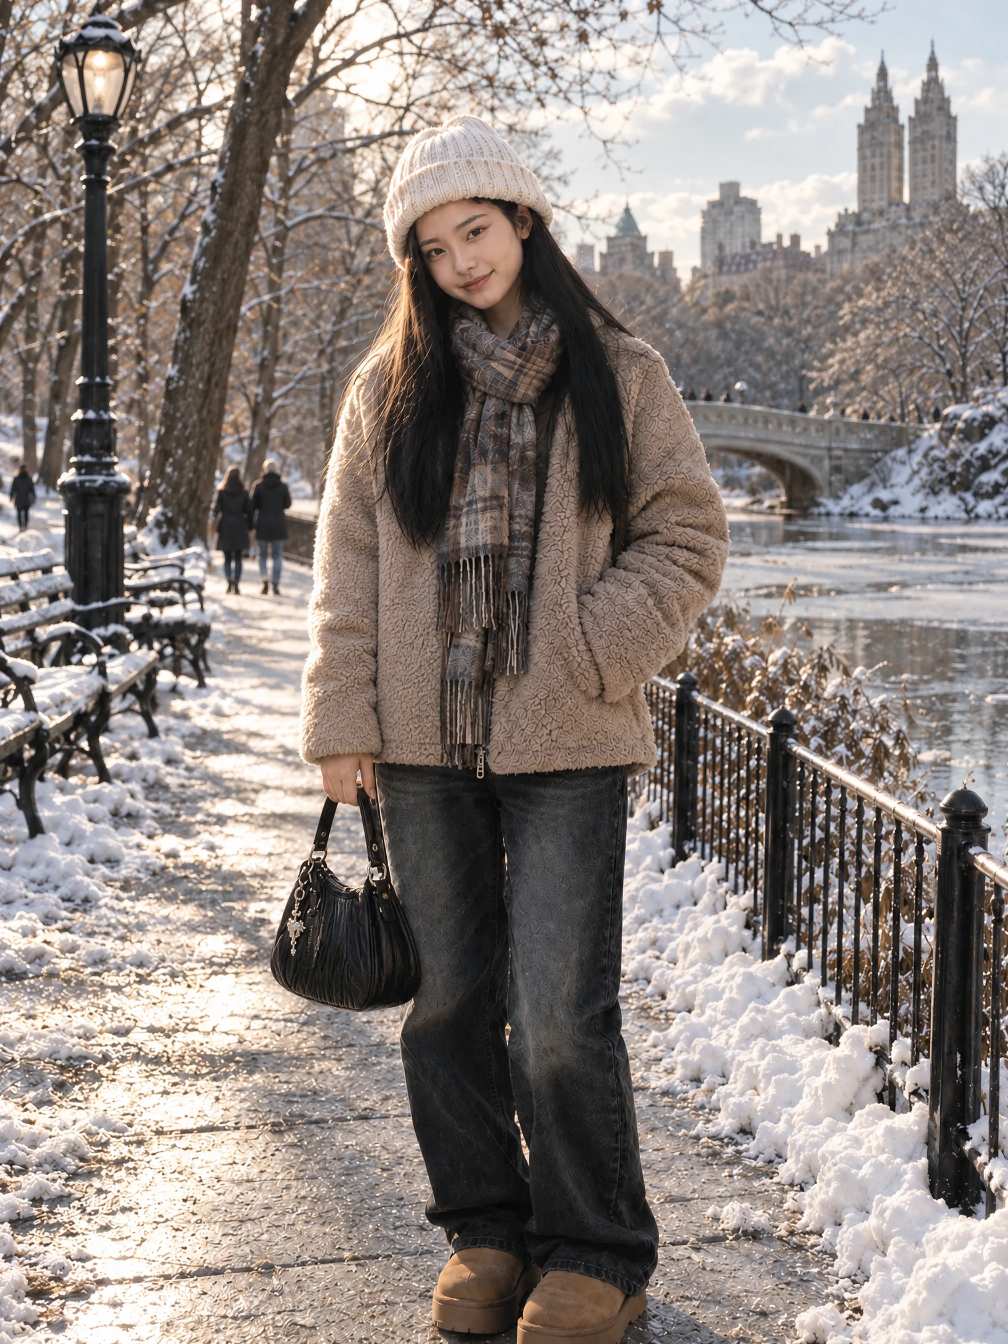
Image 1:
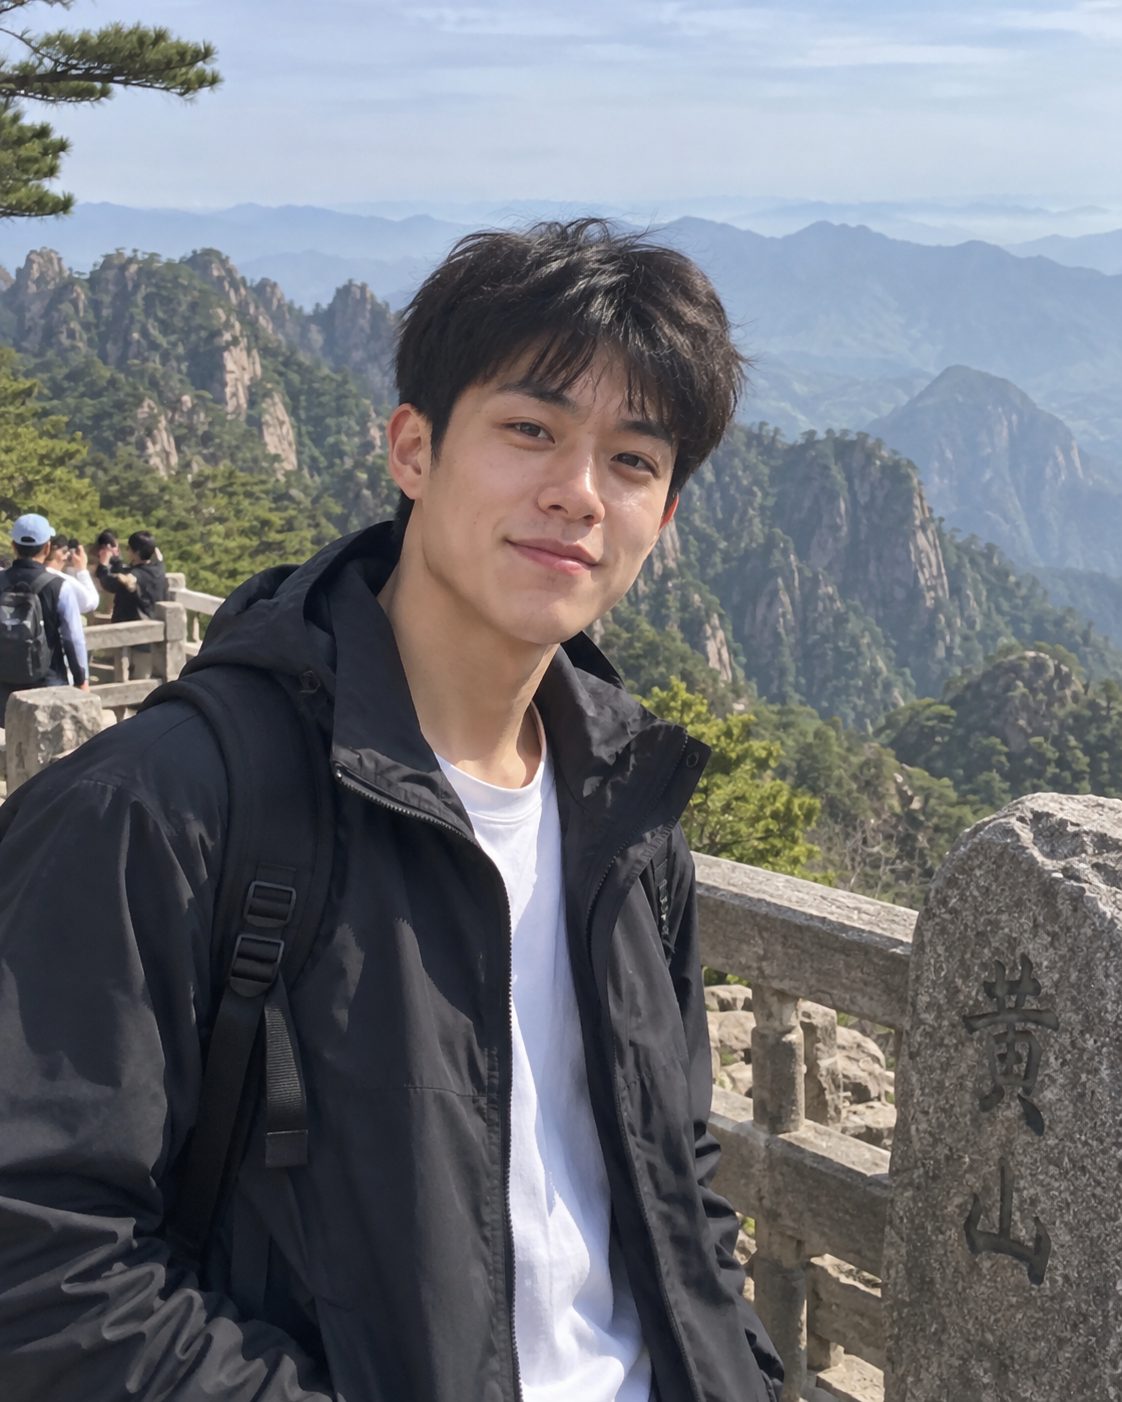
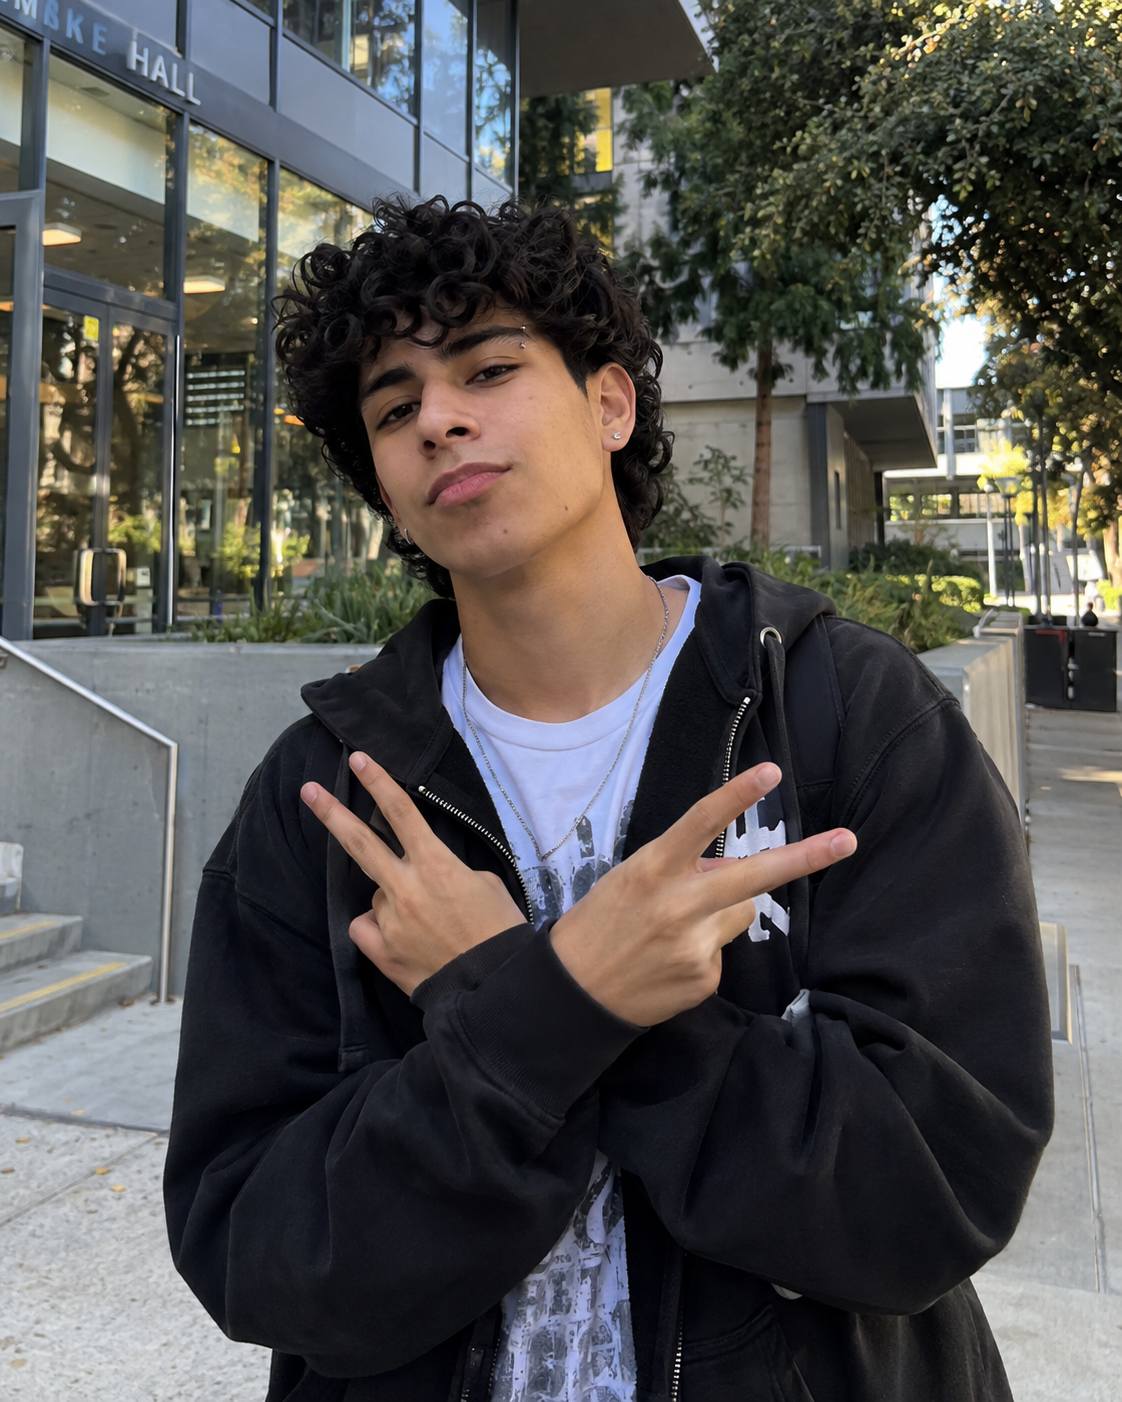
Image 2:
Prompt example:
Place the person from Image 1 and the person from Image 2 naturally in the same party scene. Preserve both people's facial features, hairstyles, clothing, and body proportions. Match their scale, perspective, lighting, shadows, and camera distance so they appear to have been photographed together.
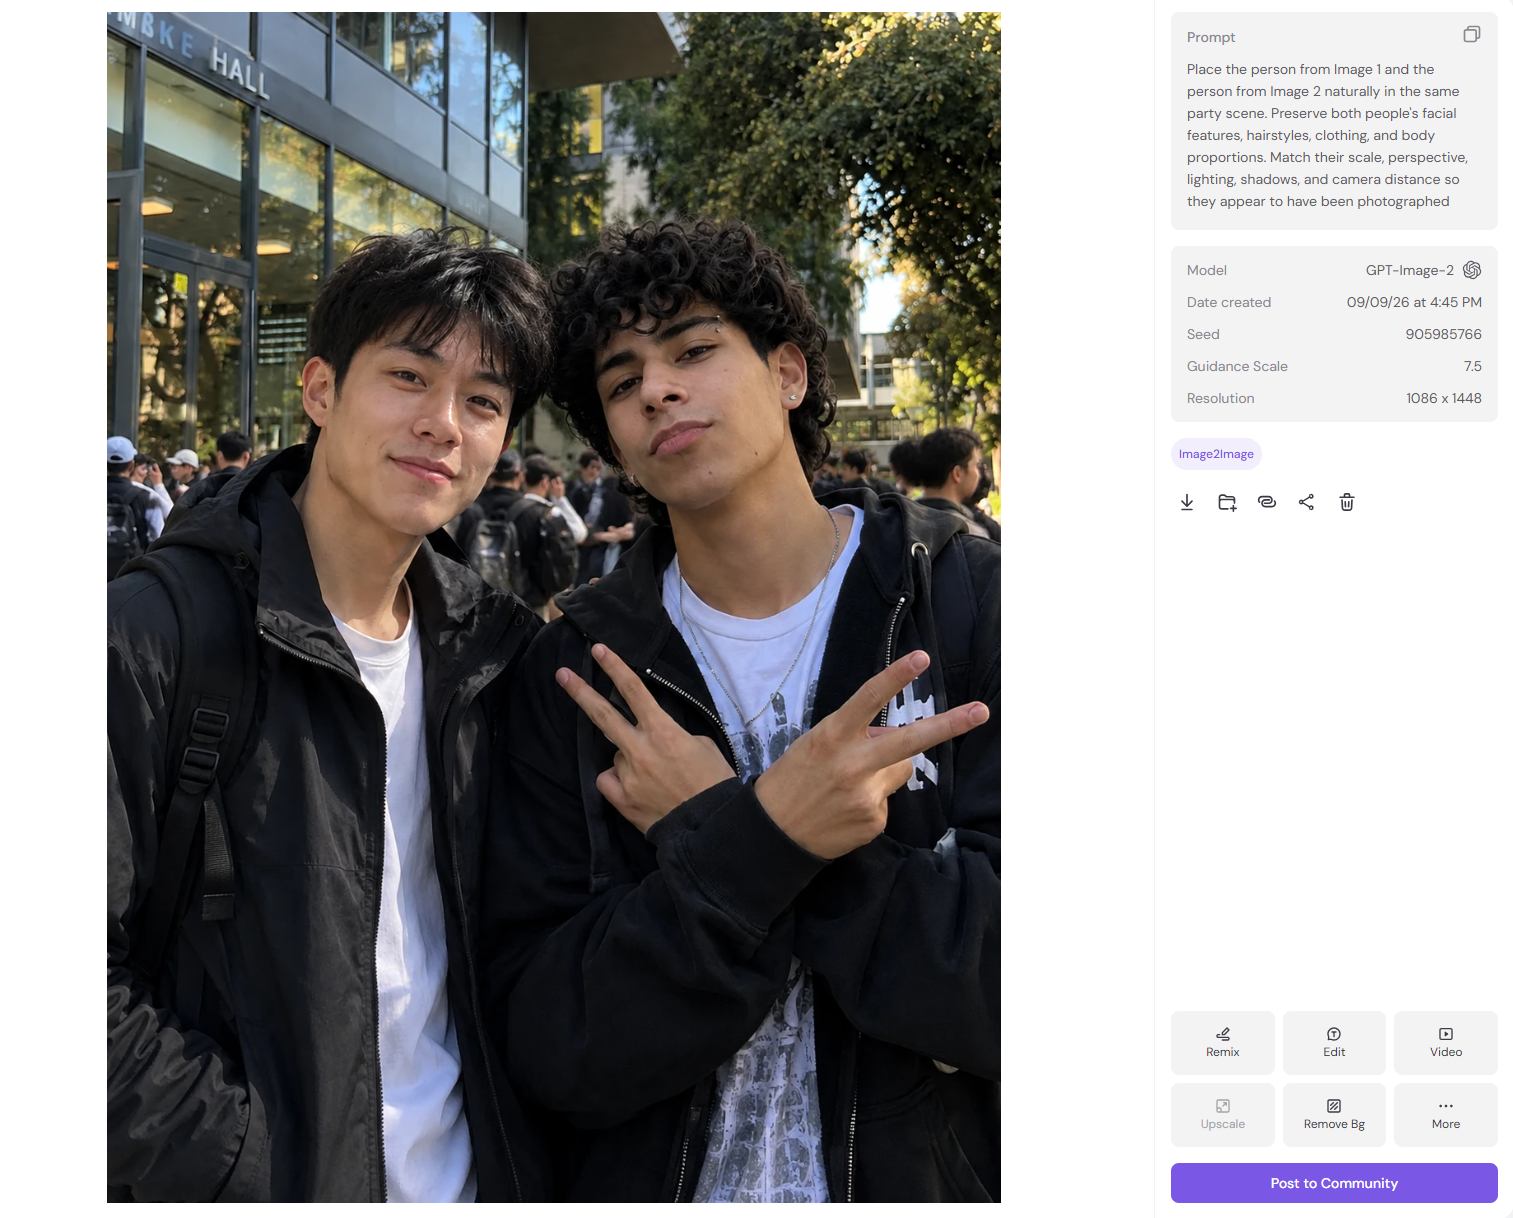
Scale, lighting direction, and camera perspective are especially important when combining subjects from different images.
Restyle and Recompose an Existing Image
Some edits change the overall visual treatment or framing rather than a single object.
Restyle an Image While Keeping the Composition
State which structural elements should remain and which visual qualities should change.
Prompt example:
Preserve the original subject, pose, camera angle, composition, and object placement. Re-render the image as a hand-painted editorial illustration with clean shapes, soft natural colors, visible brush texture, and detailed facial features.
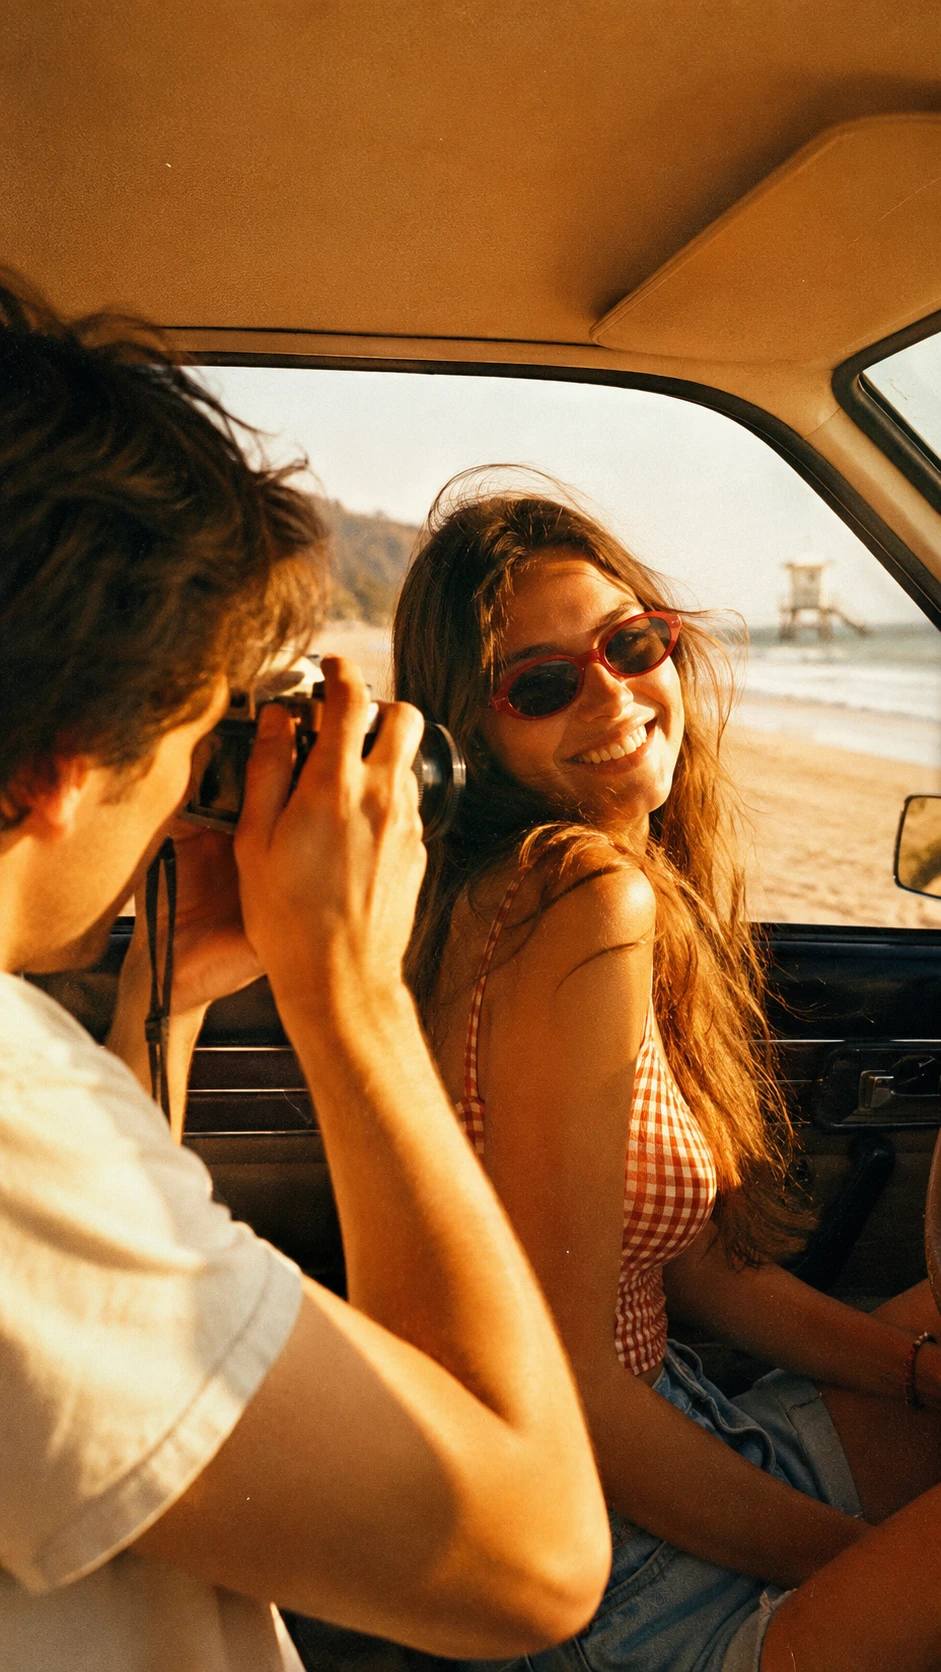
Before
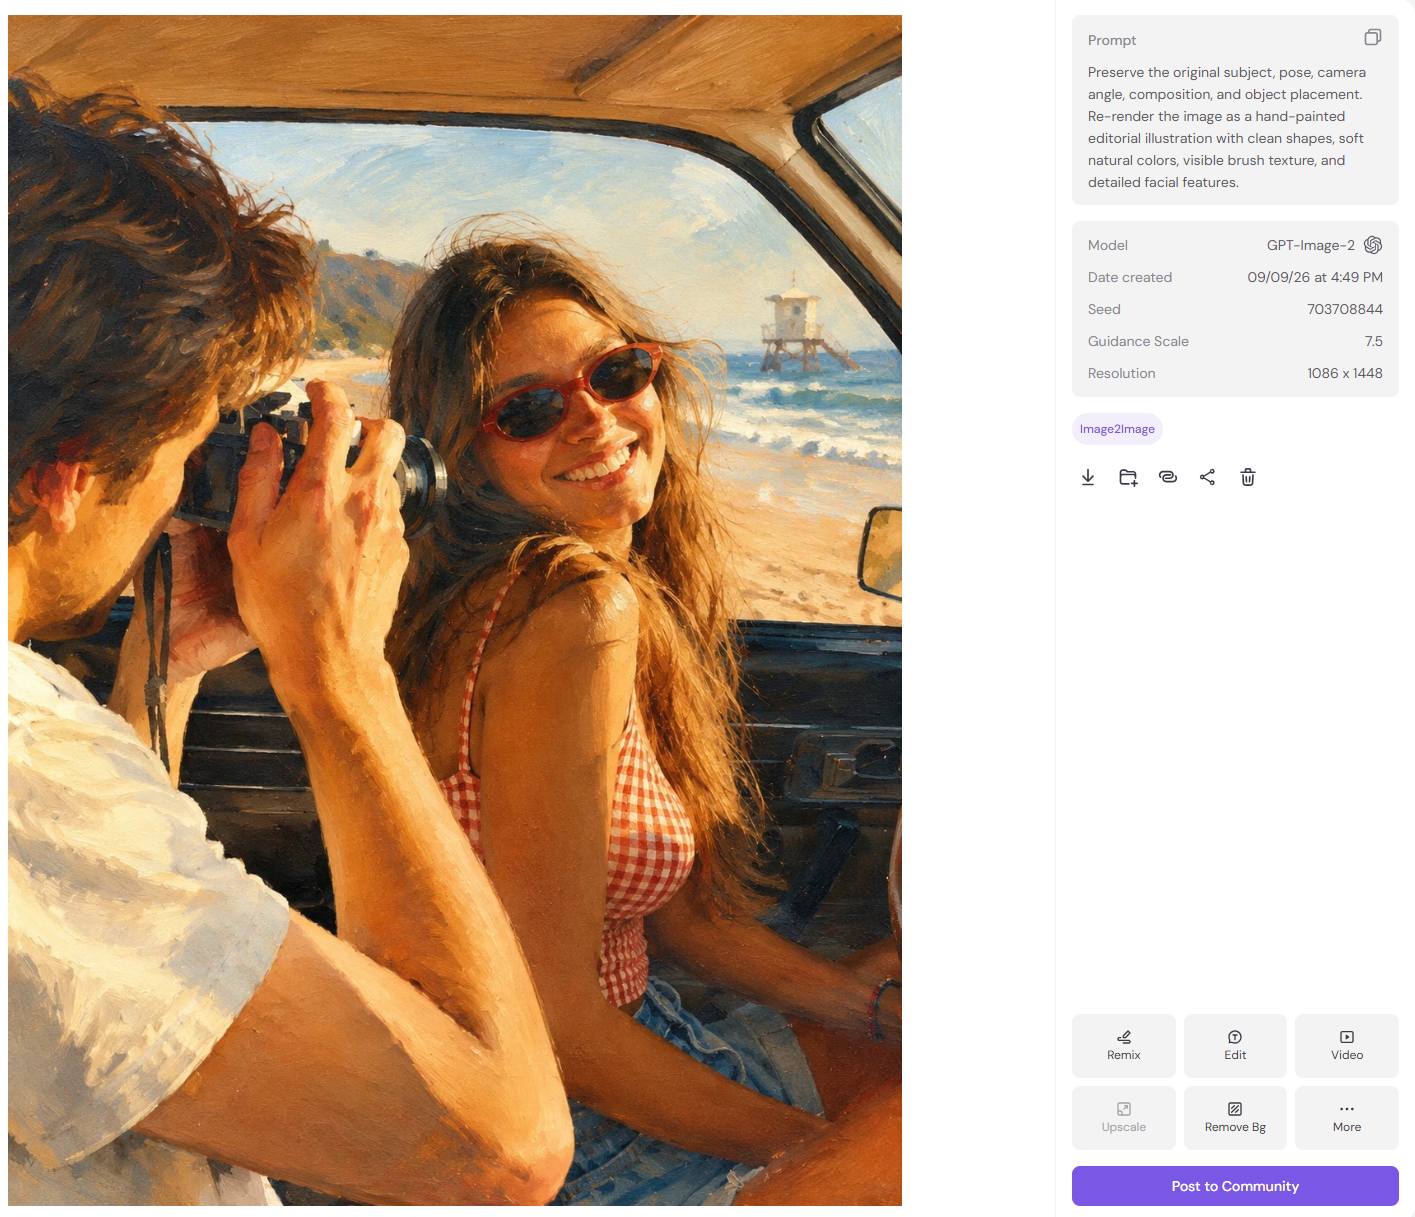
After
For style changes, keep composition instructions separate from style instructions.
Change the Composition or Camera Framing
You can also request a different framing while keeping the same subject and scene.
Prompt example:
Recompose the image into a wider editorial shot. Keep the same woman, clothing, pose, environment, and lighting. Show more space around the subject and place her slightly left of center.
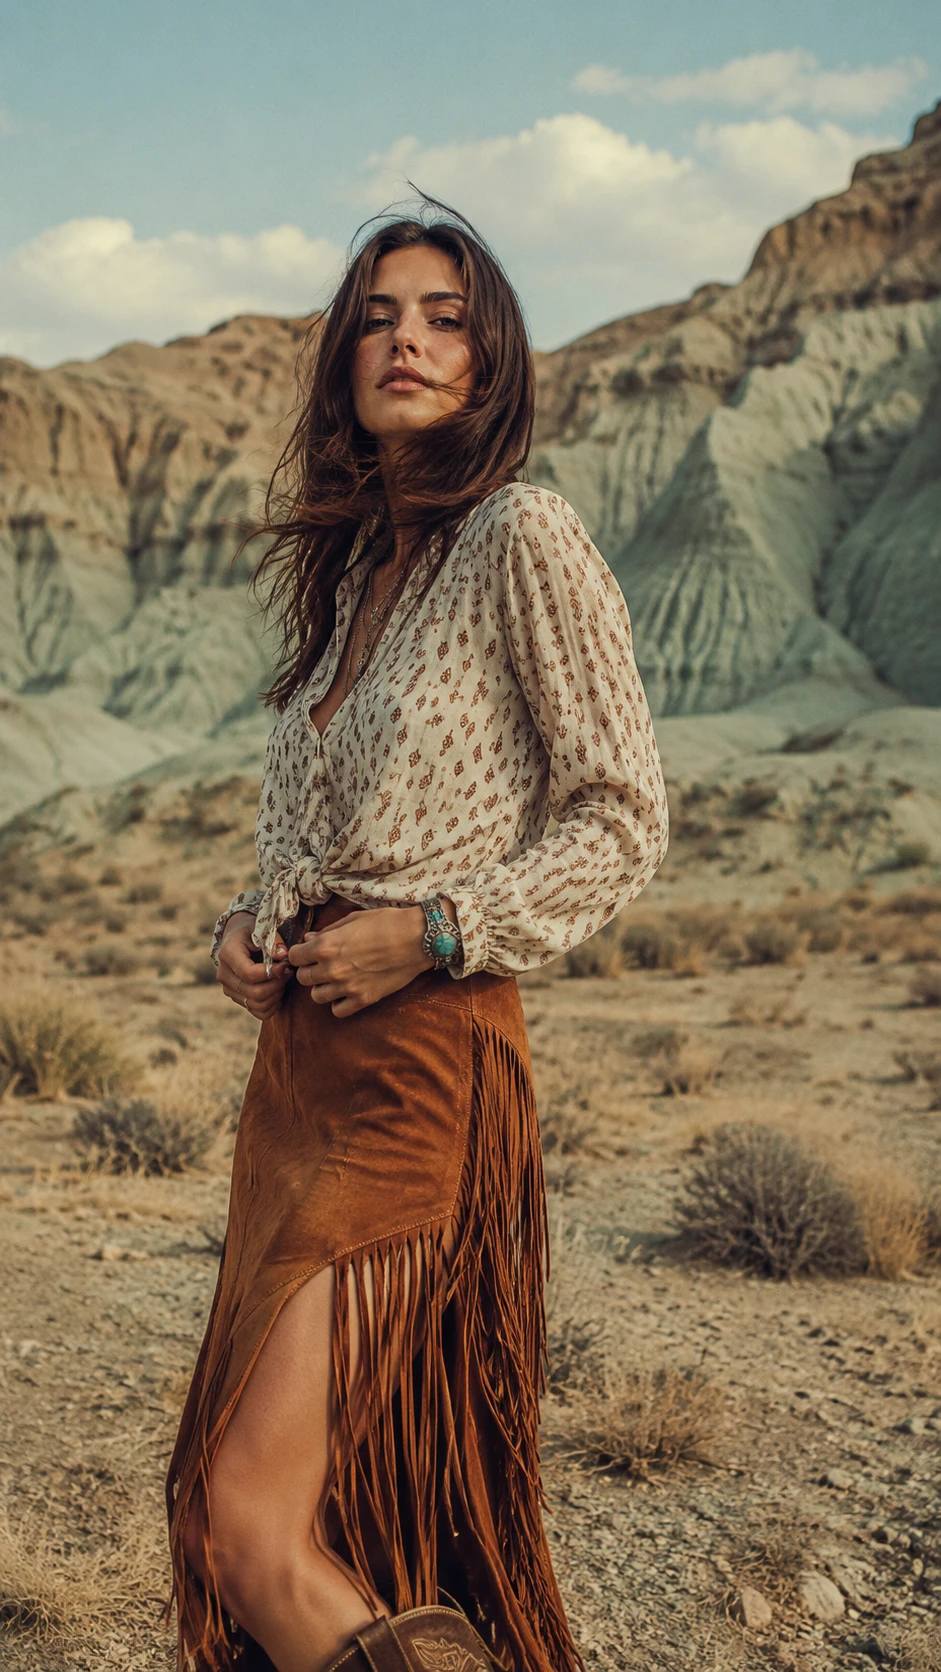
Before
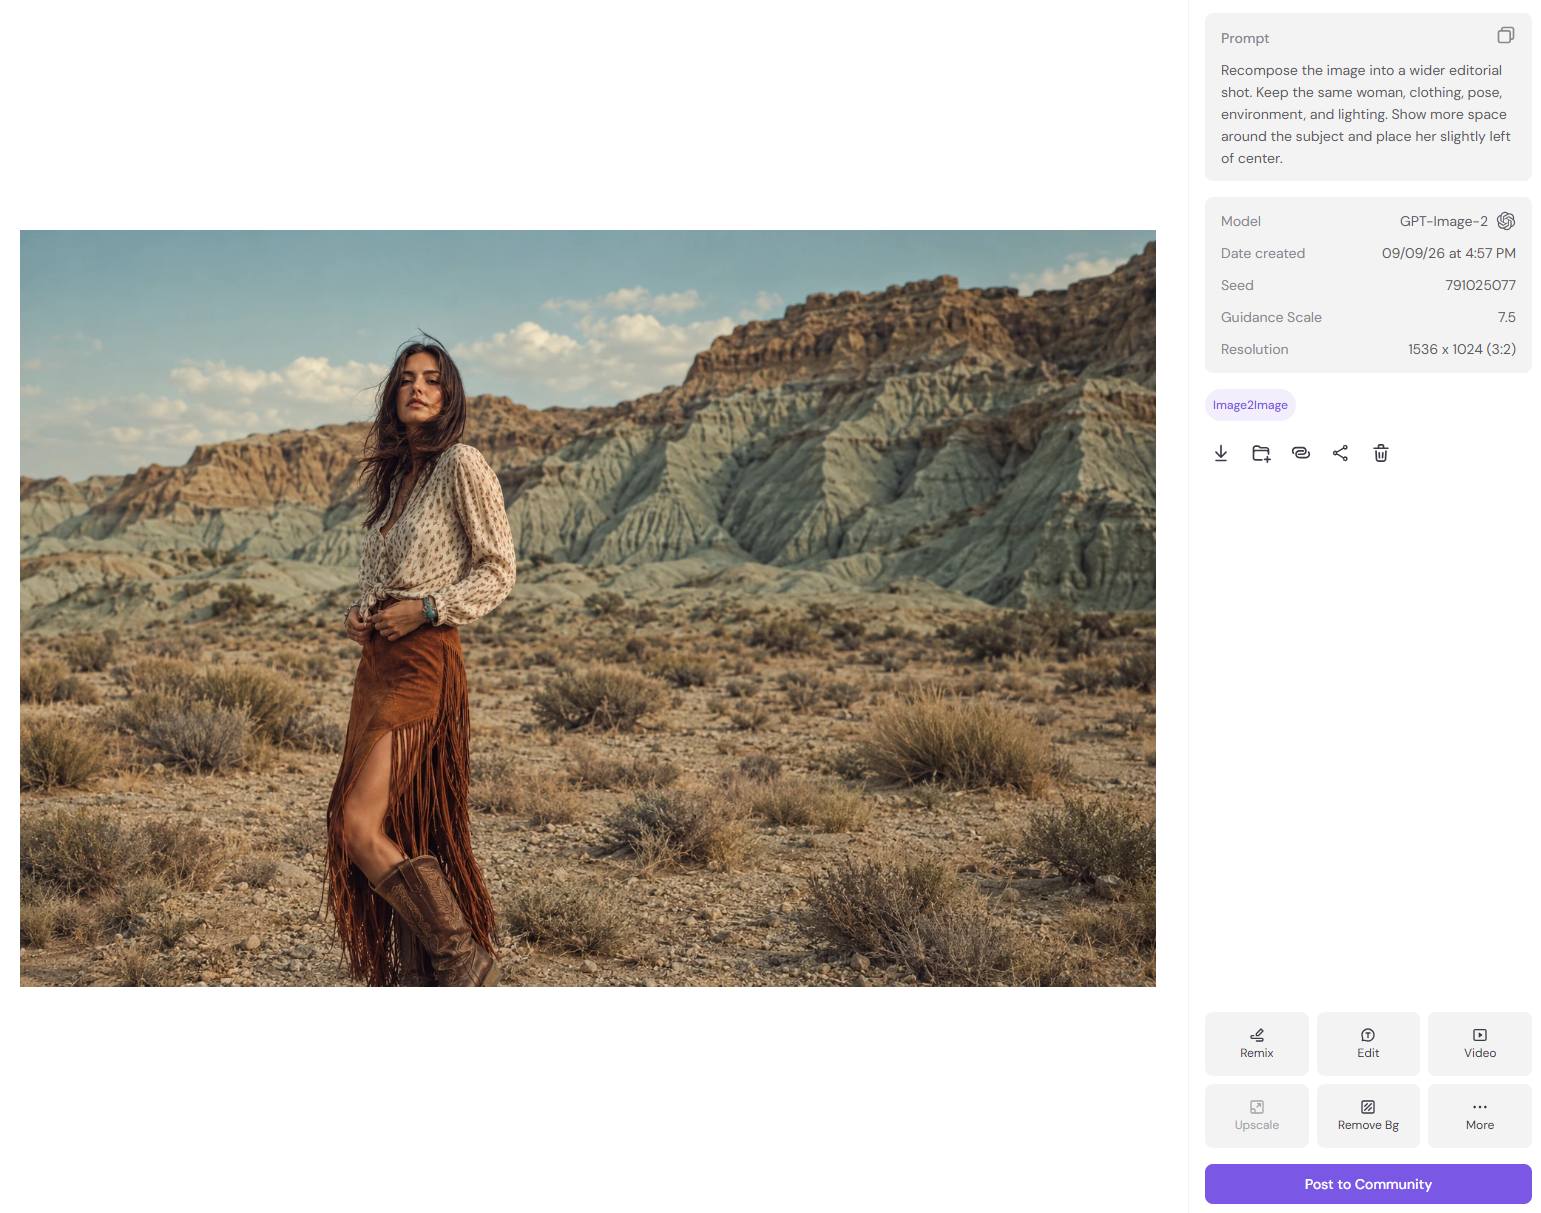
After
The same method can be used for closer portraits, wider shots, centered compositions, or layouts with more negative space.
How to Write Better AI Image Editing Prompts
Clear editing prompts usually have clear boundaries.
Specify What Should Change
Start with a direct action.
For example:
Replace only the handbag.
Remove the person in the background.
Change the jacket from blue to dark red.
Avoid instructions that do not identify a clear editing target.
Specify What Should Stay Unchanged
If important parts of the original already look right, name them.
For example:
Keep the face, hairstyle, pose, clothing, background, lighting, and camera angle unchanged.
Only include the details that matter for the final result.
Assign a Role to Each Reference
When several images are involved, define what each one controls.
For example:
Use Image 1 for the character. Use Image 2 for the product. Use Image 3 for the environment.
This reduces the chance of visual details being mixed between references.
Describe How the New Element Should Fit the Scene
For object replacement and multi-image composition, include the physical details that affect realism:
Scale
Perspective
Lighting
Shadows
Reflections
Depth of field
Contact with nearby objects
These details help the edited element sit naturally in the scene.
A Simple AI Image Editing Prompt Formula
A practical structure is:
Edit action + target + reference + preserved elements + integration requirements
Simple edits may need only one sentence. Multi-reference edits usually benefit from clearer reference roles and preservation instructions.
Common AI Image Editing Problems and How to Fix Them
The Image Changes More Than Expected
Make the editing boundary more specific.
Instead of:
Change the dress to black.
Use:
Change only the dress to black. Keep the face, hairstyle, pose, hands, body proportions, background, lighting, and camera angle unchanged.
The Face Changes During Editing
Specify the features that need to remain consistent.
Prompt example:
Preserve the original facial features, face shape, eyes, nose, mouth, skin texture, hairstyle, and expression.
A clear portrait reference can also help maintain the subject's appearance.
The Product Does Not Match the Reference
Identify the product details that need to stay consistent.
Prompt example:
Preserve the packaging shape, bottle proportions, cap design, label position, colors, and graphic layout from Image 2.
Use a reference where the product is clearly visible.
The New Object Does Not Fit the Scene Naturally
Add instructions related to physical integration.
Prompt example:
Match the perspective, scale, lighting direction, contact shadows, reflections, depth of field, and surrounding color temperature.
For handheld objects, natural hand contact and occlusion also matter.
Multiple References Are Mixed Together
Clarify the role of each reference.
Prompt example:
Use Image 1 only for the character. Use Image 2 only for the handbag. Use Image 3 only for the background.
Keep each reference assignment as specific as possible.
What Makes a Good AI Image Editing Prompt?
Before generating, check four things:
1. What should change?
2. Which reference controls that change?
3. What should remain unchanged?
4. How should the edited element fit the original scene?
A good editing prompt does not need to be long. It needs a clear target, a clear reference, and a clear boundary.
Edit Images With PicLumen AI Image Generator
PicLumen supports image editing workflows based on existing images, reference images, and natural-language instructions.
You can use the same process for object removal, product replacement, background changes, color adjustments, character consistency, multi-image composition, and restyling.
👉 Start with one clear edit request, keep the parts that already work, and refine only the details that still need adjustment.
Frequently Asked Questions
Can I edit an existing image with AI?
Yes. You can use an existing image as the starting point and describe which elements should be changed or preserved. Available editing options depend on the image model you select.
How do I write an AI image editing prompt?
State what should change first. Then specify what should stay unchanged and which reference should be used when needed.
How can I keep the rest of the image unchanged?
Use clear instructions such as "replace only," "change only," "keep unchanged," and "preserve." Name the parts of the image that need to remain consistent.
Can AI combine two or more images?
Yes. Supported models can use multiple reference images in one generation. Give each reference a clear role, such as character, product, clothing, or environment.
Why can the person's face change during editing?
Generative image editing creates a new result from the source image, references, and prompt, so some visual variation may occur. Clear facial preservation instructions and a strong reference image can help improve consistency.
Can I use PicLumen for product image editing?
Yes. Product references can be used for object replacement, product placement, background changes, lifestyle compositions, and other visual workflows. When product consistency matters, specify the packaging and design details that should remain unchanged.